The post Getting your list of invoices using the Okappy API appeared first on Okappy.
]]>Getting your list of invoices using the Okappy API
Okappy is a B2B workforce management platform where you can connect to your customers, employees and subcontractors. Send and receive jobs and assign them to your employees AND subcontractors. You can also raise invoices to your customers and receive invoices from your subcontractors.
To get your list of invoices using the Okappy API, follow the instructions below.
Authentication
First you will need to get an up to date authentication token. For further information see authenticating with Okappy.
Getting your list of invoices
Get your list of jobs using the following endpoint.
GET /invoices
Headers
| Header | Content |
|---|---|
| Authorize | Bearer token |
The token should be a string taken from the “access_token” field of a response to an authorise request.
Parameters
No parameters.
Responses
| Code | Description |
|---|---|
| 200 | Operation successful |
| 400 | Bad request |
| 401 | Unauthorised |
| 415 | Data sent in wrong format (should be JSON) |
The post Getting your list of invoices using the Okappy API appeared first on Okappy.
]]>The post Retrieving details of an invoice using the Okappy API appeared first on Okappy.
]]>Retrieving details of an invoice using the Okappy API
Okappy is a B2B workforce management platform where you can connect to your customers, employees and subcontractors. Send and receive jobs, raise invoices for customers and receive invoices from your subcontractors.
Coming soon…
The invoices API is currently in beta. For early access please contact us.
The post Retrieving details of an invoice using the Okappy API appeared first on Okappy.
]]>The post Raising an invoice using the Okappy API appeared first on Okappy.
]]>Raising an invoice using the Okappy API
Okappy is a B2B workforce management platform consisting of companies, employees and devices. Companies can connect to customers, subcontractors and employees. Add jobs and then assign those jobs to an employee or subcontractor. You can also raise invoices to your customers or receive invoices from your subcontractors.
To raise an invoice using the Okappy API, follow the instructions below.
Authentication
First you will need to get an up to date authentication token. For further information see authenticating with Okappy.
Raising an invoice
Raise an invoice using the following endpoint.
POST /invoices
Headers
| Header | Content |
|---|---|
| Authorize | Bearer token |
The token should be a string taken from the “access_token” field of a response to an authorise request.
Parameters
No parameters
Body data
The following table lists the fields that may be present in the body data:
| Name | Content | Required |
|---|---|---|
| connectTo | The customer ID of the invoicee | Yes |
| customerReference | No | |
| materialsCostDescription | No | |
| labourCostDescription | No | |
| otherCostDescription | No | |
| taxDate | The date of the invoice, in the format yyyy-mm-dd h:mm | Yes |
| materialsCost | No | |
| labourCost | No | |
| otherCost | No | |
| netAmountCustomer | The total net amount of the invoice | Yes |
| invoiceType | “raised” or “draft” | Yes |
| companyName | The name of the company being invoiced | No |
| invoiceAddress | The address of the invoicee | No |
| vatAmount | The VAT amount of the invoice | Yes |
| deduction | Any deduction for CIS | No |
| invoiceItems | An array of items.
See table below for item fields |
No |
Invoice items
If an array of invoice items is included in the body data, these are the fields may be included in each item.
| Name | Content | Required |
|---|---|---|
| item | Item name | Yes |
| description | A description of the item | Yes |
| quantity | The number of items | Yes |
| unitPrice | The net price per item | Yes |
| discount | Amount discounted (Usually CIS) | No |
| vat | VAT amount | Yes |
| netAmount | net amount | Yes |
| vatReverse | True if the item may be considered DRC | No |
| itemCode | A short code | No |
Response
| Code | Description |
|---|---|
| 200 | Invoice created successfully |
| 400 | Bad request |
| 401 | Unauthorised |
| 415 | Data sent in wrong format (should be JSON) |
The post Raising an invoice using the Okappy API appeared first on Okappy.
]]>The post VAT Reverse Charge with Okappy and Xero appeared first on Okappy.
]]>How to raise a VAT reverse charge invoice for a customer using Okappy and Xero
From 1st March 2021, if you supply goods and services to the construction sector, then you will need to implement VAT reverse charging on your invoices.
Domestic reverse charge VAT legislation (DRC) is a change in the way Construction Industry Scheme (CIS) registered construction businesses handle and pay VAT. It is being introduced in the UK on 1 March 2021, having previously been delayed from October 2019.
Read on for step by step instructions on raising an invoice with a VAT reverse charge.
Set up a Xero Domestic Reverse Charge tax rate
From within Xero,
- Go to the Account menu
- Select Advanced
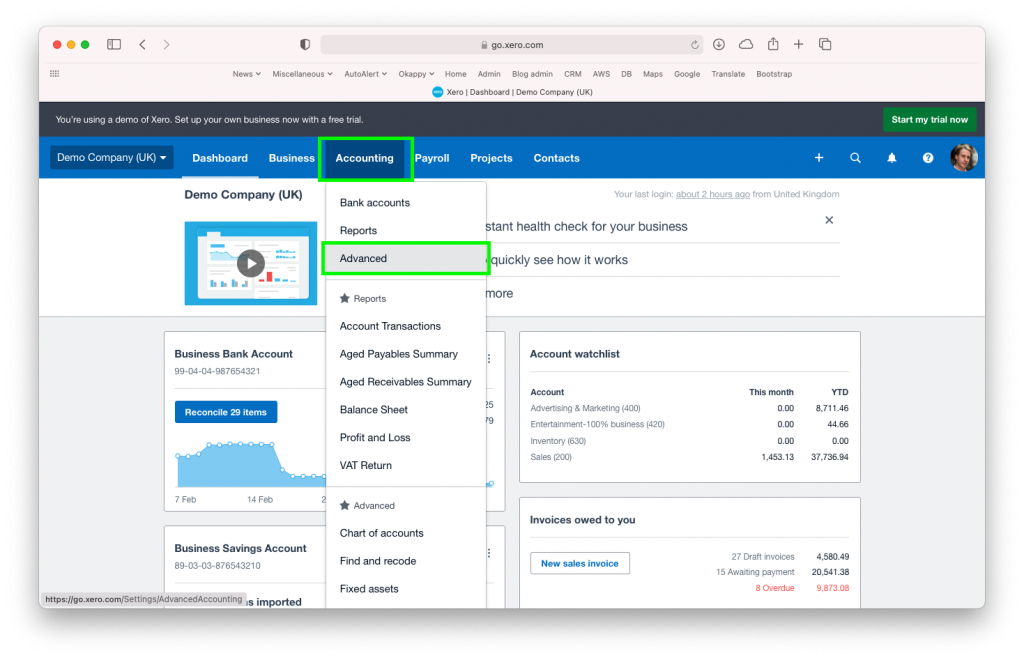
- Click Add Domestic Reverse Charge Tax Rates
- Click Add Domestic Reverse Charge Tax Rates to confirm

For more information, see Xero support.
Add/edit a product or service in Xero
To add or edit a product or service to include the VAT reverse charge
- Go to the Business menu
- Select Products and Services

- Edit an existing Item, or select + New Item

- Enter the details for your item including the Unit Price, Sales Account and Description
- Select the new Domestic Reverse Charge rate you added previously.
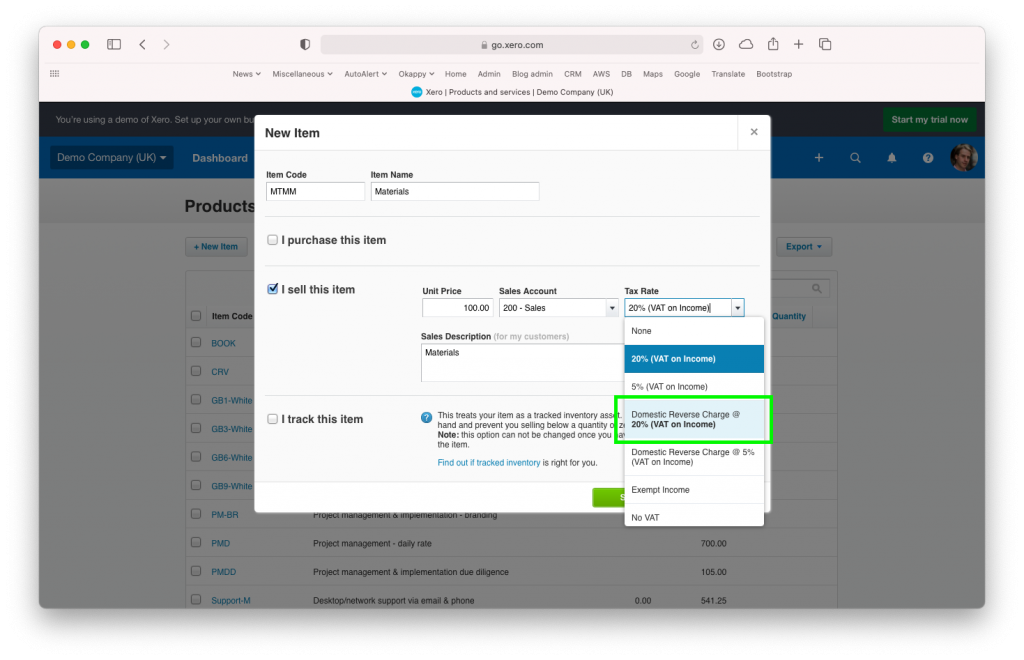
- Click Save
Set up your customer for CIS in Okappy
Set up your customer in Okappy as a CIS customer
- Go to the Connections menu
- Find the relevant customer
- Click Account settings

- Check VAT reverse charge
- Enter the CIS rate

Raise your invoice and export to Xero
- Raise your invoice for your customer
- Select the item which you added in Xero
The tax rate will automatically update to show Reverse charge applied and the total VAT will be updated.

The final invoice will show that Reverse charge applies and that the customer to account to HMRC for the reverse charge output tax on the VAT exclusive price of items marked reverse charge at the relevant VAT rate as shown above.

You can export your invoices to Xero and the line items and tax rate will be automatically calculated in Xero.
See How to export your invoices to Xero for more information.
For more information on raising invoices, see
For further information
For further information search in our support pages or forum
The post VAT Reverse Charge with Okappy and Xero appeared first on Okappy.
]]>The post VAT Reverse Charge with Okappy and QuickBooks appeared first on Okappy.
]]>How to raise a VAT reverse charge invoice for a customer using Okappy and QuickBooks
From 1st March 2021, if you supply goods and services to the construction sector, then you will need to implement VAT reverse charging on your invoices.
Domestic reverse charge VAT legislation (DRC) is a change in the way Construction Industry Scheme (CIS) registered construction businesses handle and pay VAT. It is being introduced in the UK on 1 March 2021, having previously been delayed from October 2019.
Read on for step by step instructions on raising an invoice with a VAT reverse charge.
Set up QuickBooks for Domestic Reverse Charge
From within QuickBooks,
- Go to your Account and settings menu

- Select Advanced

- Ensure that Enable CIS is turned On.
For more information, see QuickBooks support.
View/edit a product or service in QuickBooks
To view or edit your product or services in QuickBooks
- Go to the Invoicing menu
- Select Products and Services

- Edit an existing item (Product and Service), or select New

Set up your customer for CIS in Okappy
Set up your customer in Okappy as a CIS customer
- Go to the Connections menu
- Find the relevant customer
- Click Account settings

- Check VAT reverse charge
- Enter the CIS rate

Raise your invoice and export to QuickBooks
- Raise your invoice for your customer
- Select the item which you added in Xero
The tax rate will automatically update to show Reverse charge applied and the total VAT will be updated.

The final invoice will show that Reverse charge applies and that the customer to account to HMRC for the reverse charge output tax on the VAT exclusive price of items marked reverse charge at the relevant VAT rate as shown above.

You can export your invoices to QuickBooks and the line items and tax rate will be automatically calculated in QuickBooks.
See How to export your invoices to QuickBooks for more information.
For more information on raising invoices, see
For further information
For further information search in our support pages or forum
The post VAT Reverse Charge with Okappy and QuickBooks appeared first on Okappy.
]]>The post How to raise a VAT reverse charge invoice appeared first on Okappy.
]]>How to raise a VAT reverse charge invoice for a customer
From 1st March 2021, if you supply goods and services to the construction sector, then you will need to implement VAT reverse charging on your invoices.
Domestic reverse charge VAT legislation (DRC) is a change in the way Construction Industry Scheme (CIS) registered construction businesses handle and pay VAT. It is being introduced in the UK on 1 March 2021, having previously been delayed from October 2019.
Read on for step by step instructions on raising an invoice with a VAT reverse charge.
Configure your invoice items as VAT rechargeable
VAT reverse charge should be applied to certain items. For more information, see the VAT reverse charge guidance.
Note: If you are using Xero, please following these Xero specific instructions.
To enable VAT reverse charge on a specific item,
- Go to the Invoices screen
- Click Invoice options
- Click Account settings
- Check the VAT reverse charge option next to the relevant line item

Check the VAT reverse charge option for your customer
To enable VAT reverse charges for a customer’s invoice, choose the relevant customer from the connections screen, then
- Click the three dots next to the customer name
- Click Accounts settings

Click the VAT Reverse Charge checkbox
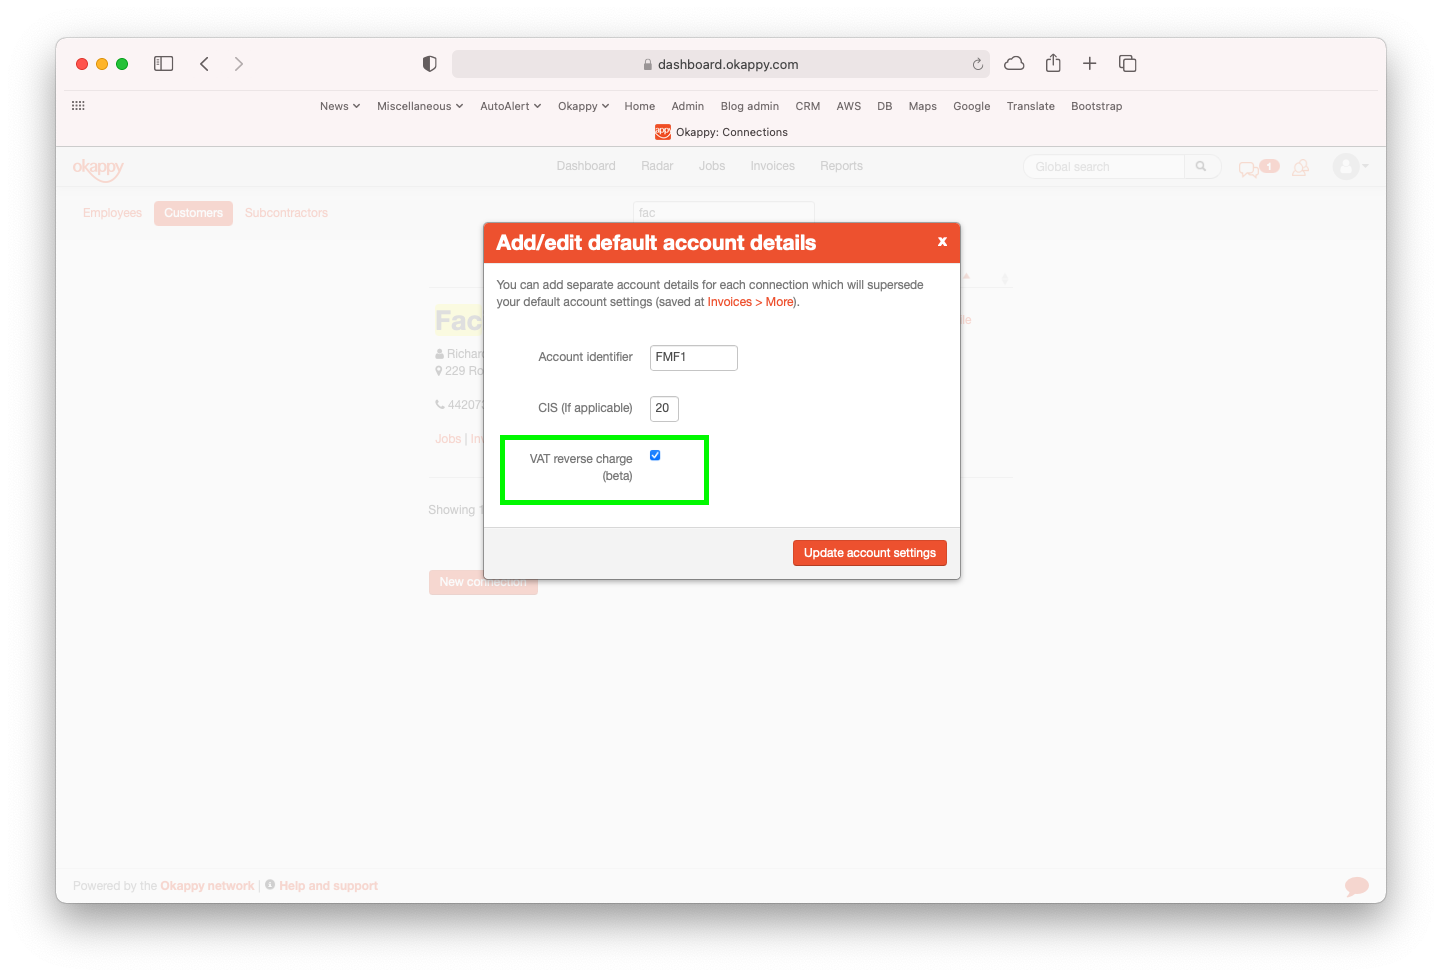
Click Update account settings
Raise your invoice
You can now raise your invoices for your customer and the VAT reverse charge label will show for any VAT reverse chargeable items.
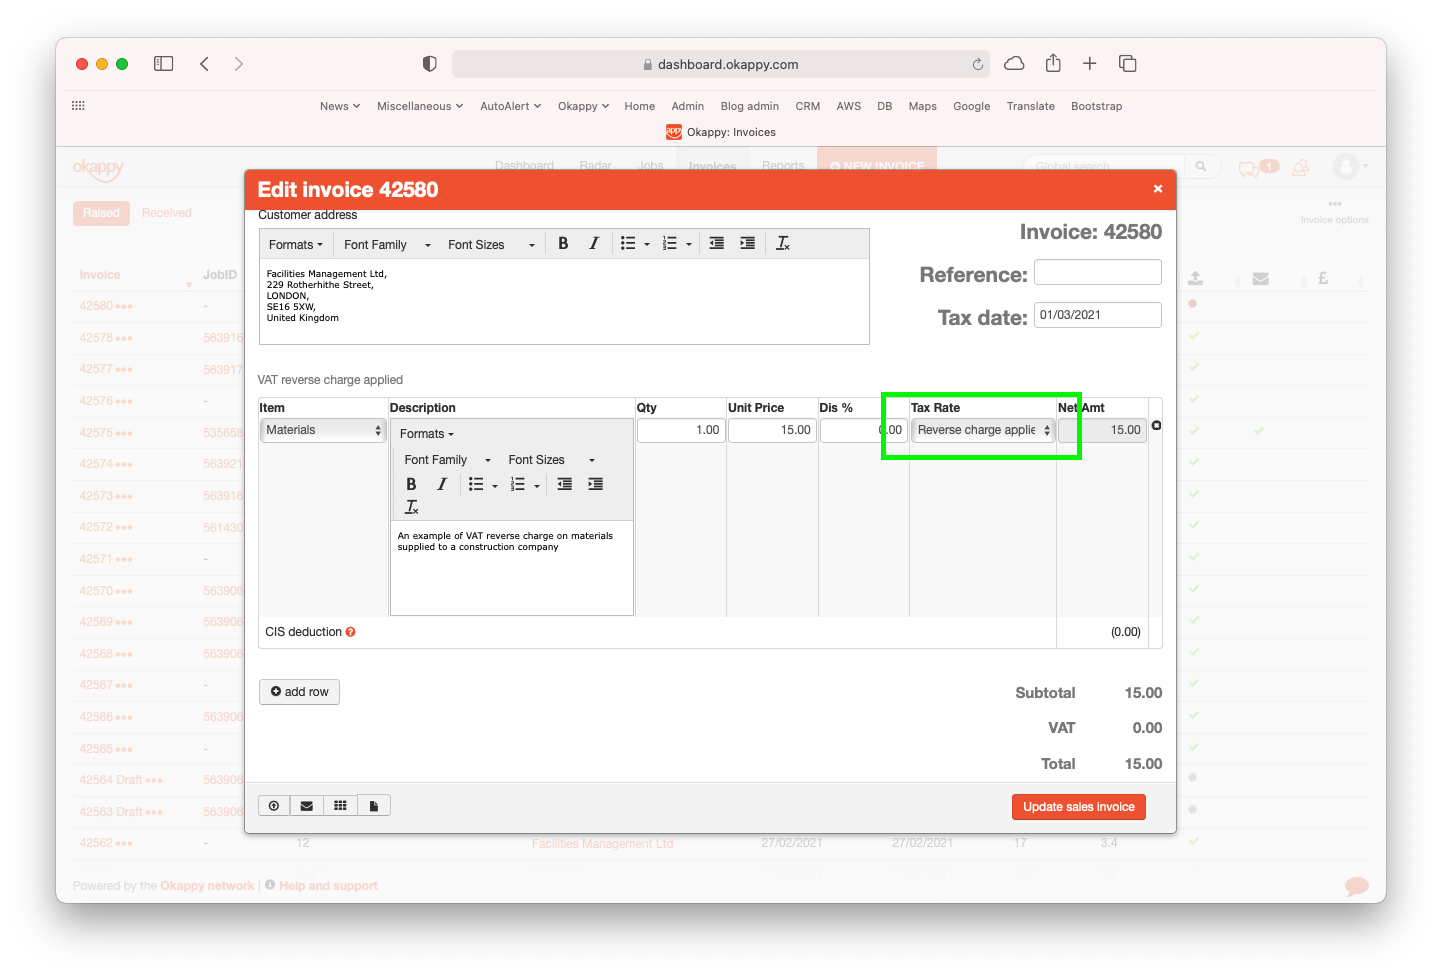
The final invoice will show that Reverse charge applies and that the customer to account to HMRC for the reverse charge output tax on the VAT exclusive price of items marked reverse charge at the relevant VAT rate as shown above.

For more information on raising invoices, see
For further information
For further information search in our support pages or forum
The post How to raise a VAT reverse charge invoice appeared first on Okappy.
]]>The post Changing the customer on an invoice (legacy invoicing) appeared first on Okappy.
]]>Changing the customer on an invoice (legacy invoicing functionality)
With Okappy, you can easily raise invoices from your jobs or create a miscellaneous invoice. But what if you’ve raised the invoice for the wrong customer and you need to change it.
To change the customer, you have a couple of different options depending on whether the invoice was originally created from a job and whether you want to keep that link.
Changing an invoice which does not need to be linked to a job
If the invoice was not created from a job, or it doesn’t matter whether the link is maintained. Then you can change the customer on an invoice by simply creating a credit note to cancel the existing invoice and then raising a new miscellaneous invoice to the correct customer.
You can create the credit note and new invoice easily by copying the existing invoice.
See this post for step by step instructions on creating a credit note.

Changing the customer on an invoice which is linked to a job
If the invoice was created from a job with the wrong customer, and you want to maintain the link to the job. Then you also need to change the customer on the job. To do this
- First create a credit note to cancel the existing invoice, then
- Go to the Jobs screen
- Find your job.
- If the job has not been archived, you can change the customer by clicking the three dots next to the job id and then selecting change customer (provided the job was not added by a connection)

- If the job has been archived, first unarchive the job by
- Clicking into the job details
- Clicking the status dropdown and selecting unarchive
- Clicking the Update job button
- You can then change the customer by clicking on the customer name
- Select the new customer from the pop up box, and
- Click Update job
- Click the back button to go back to your jobs list.
- You can then raise another invoice from the job with the correct customer by clicking on the three dots next to the job and clicking Raise invoice
Note: You will get an alert saying an invoice has already been raised. This is fine, simply click create to raise a new invoice.
You will now have three invoices. The original invoice with the incorrect customer, a credit note to cancel it and the new invoice to the correct customer.

The post Changing the customer on an invoice (legacy invoicing) appeared first on Okappy.
]]>The post Searching for information appeared first on Okappy.
]]>Searching for information
Finding key information quickly is one of the things that differentiates Okappy from other software. With other systems you may have to search through lots of different pages or even through different applications.
With Okappy, all your information is available with a minimum number of clicks.
Read on to find out how to get find information quickly and easily using the smart filters or global search.
Using the smart filters
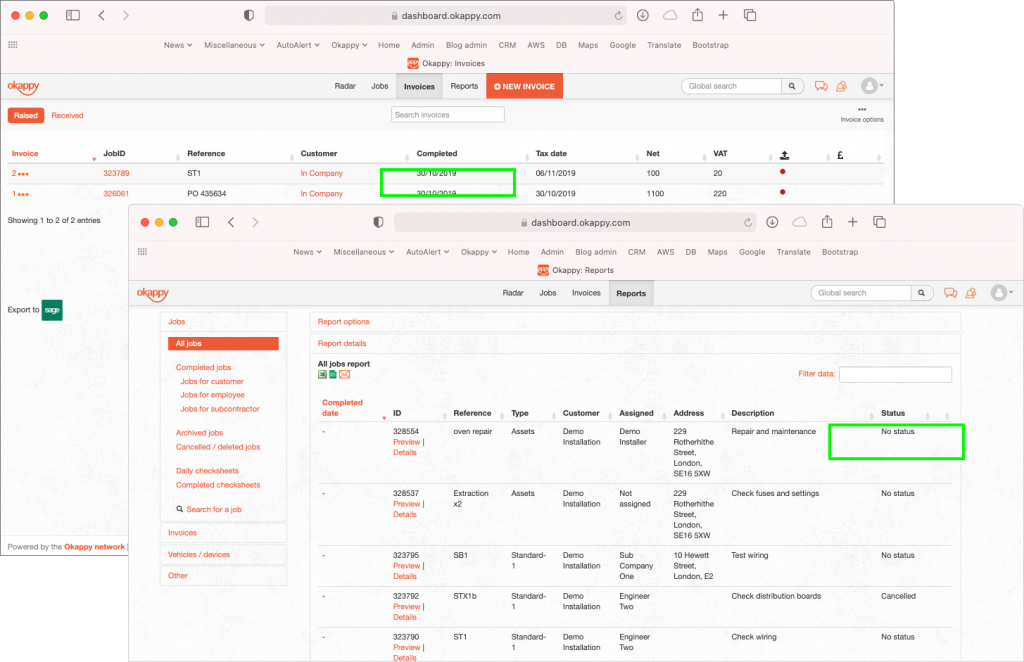
Smart filters are available throughout Okappy. You can use them to quickly search in your jobs screen, through your invoices, connections or in a generated report.
Start typing part of a word to quickly filter down to the relevant jobs or invoice etc which contain that word. You could try with a postcode, name or telephone number or any part of the description.
Smart filters are available in the following screens
- jobs dashboard
- invoices
- connections
- reports
Using the global search
Global search is also available throughout the app. Simply enter a word in the global search bar and click the magnifying glass to start searching.
The window will show the relevant results depending on what screen you are currently in. If you are in the jobs dashboard, the first results shown will be for any relevant jobs.

From there, you can also search other areas such as related invoices

You can search your Customers, or search support articles

For further information
For further information search in our support pages or forum
The post Searching for information appeared first on Okappy.
]]>The post Raise a credit note (legacy) appeared first on Okappy.
]]>Raise a credit note (legacy invoicing)
With Okappy, you can raise invoices from your jobs or create a miscellaneous invoice. But what if you’ve made a mistake on your invoice and need to either cancel it completely or amend the amount. It’s easy, you can raise a credit note with just a few clicks!
If you’re using Okappy’s legacy invoicing functionality and want to cancel or amend an invoice, the easiest way is to select your existing invoice and then click copy invoice.
(See what’s new with Okappy invoicing)
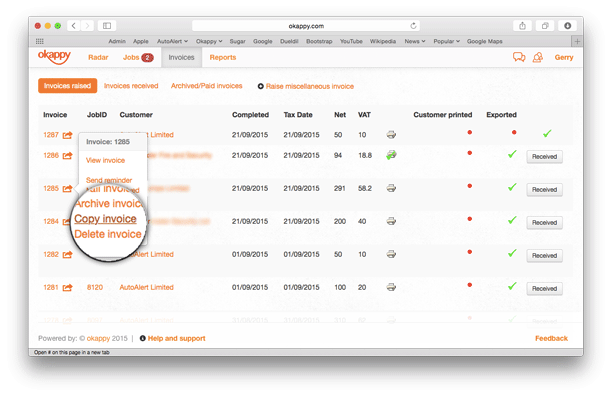
This will create a new miscellaneous invoice with the same details. You can then either change the amount to negative to offset your original invoice or add a different amount to either reduce or increase your existing invoice.
When you enter a negative amount, the heading which says miscellaneous invoice will automatically change to Raise credit note.
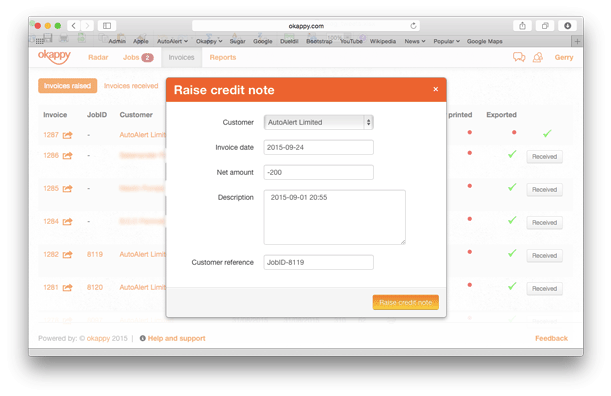
You can also change any of the details in the description to make it clear that this is a credit note.
Find out more information about Okappy Job Management and how it can be benefit your business or check out support centre for more Tips.
For further information
For further information search in our support pages or forum
The post Raise a credit note (legacy) appeared first on Okappy.
]]>To generate a report of all quotes raised over a period, follow the steps below.
The post Quotes raised report appeared first on Okappy.
]]>Quotes raised report
With Okappy, you can raise quotes for your customers. All your quotes are available in the invoices dashboard. You can also generate a report for all the quotes raised for a particular customer, or for all customers, over a period of time using the Quotes report.
To generate a report of all quotes raised over a period, follow the steps below.
Generate your quotes report
To generate a report of all your quotes raised over a period
- Click Reports in the menu bar
- Click Invoices and then Quotes
- Select the date range
- Select the customer from the drop down or choose All customers
- Click Generate report
This will generate a report based on the tax date. It will show the tax date of the quote, quote number, reference, status, customer, net amount and the VAT amount. You can also view the details of the quote or preview the finished quote.

web report quotes
Export your quotes raised report
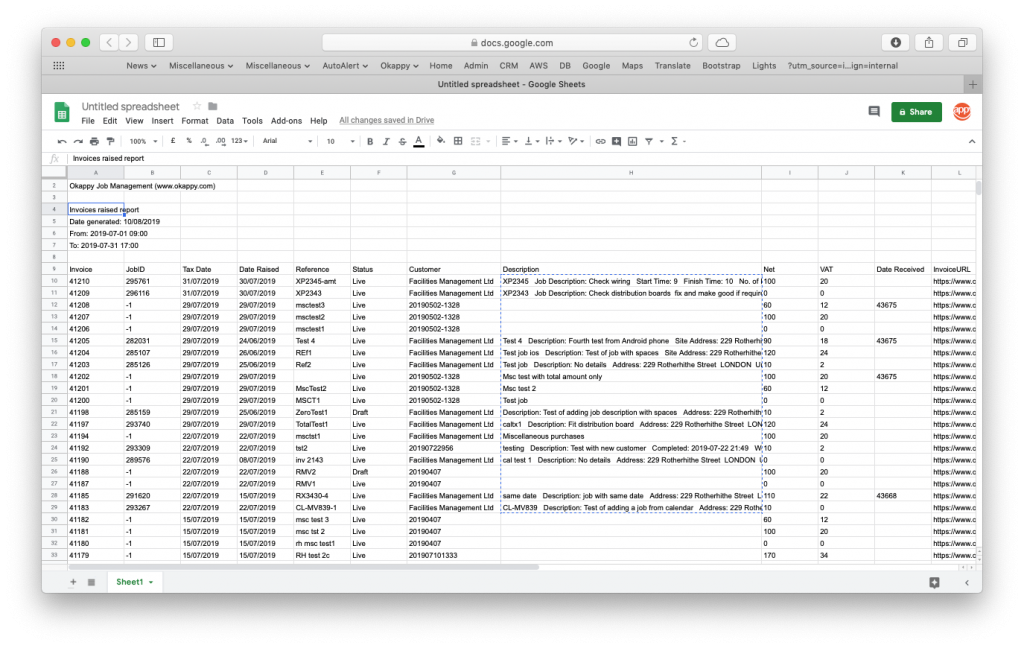
You can export your report to Microsoft Excel or Google Sheets where you can further manipulate the data, create charts and graphs or even generate beautiful dashboards which show your key metrics as they change over time.

Share your report
You can share your report by email to colleagues or your customer by clicking the email icon ( ![]() ) at the top of the report.
) at the top of the report.

Further information
For further information about the reports you can generate from within Okappy, check the reports section of our support site. Alternatively, check out the questions and answers in our forum.
The post Quotes raised report appeared first on Okappy.
]]>