- How to build your network on Okappy
- Creating and editing your own job templates
- Adding files, images and other documents to the system
The webinar lasts for 30 minutes during which time you’ll hopefully takeaway some nifty tips you can use to get the most from Okappy’s Portal+.
Introducing Okappy
Okappy is a business 2 business connected workforce management platform which applies social and market networking technology to a real business need. The need to communicate and collaborate with your employees who are often at different locations (and now more than ever). With your subcontractors and with your customers.
Okappy helps the most forward looking and dynamic companies increase transparency, reduce duplication, costs and errors and increase efficiency. Ultimately making a significant contribution to bottom line profits.
With Okappy, you can connect to your employees, customers and subcontractors. Send and receive jobs and see the status of those jobs as they’re updated by your engineers and subcontractors out in the field.
Once the job is complete, you can raise your invoices at the touch of a button.
Top 3 tips to get the most from Okappy
- Building your network on Okappy Portal+
- Creating and editing your own job templates
- Adding files, images, signatures and other documents
We chose these three top tips as that’s where we get the most interest.
People are interested in the network as it’s a new way of doing business. It’s helping the most forward looking for companies reduce duplication and errors. It’s helping them provide the best customer service and real time reporting to their own customers and it’s helping them streamline their processes when managing employees and subcontractors.
People are interested in building their own templates. It’s a relatively new feature and allows companies to really fit Okappy around their specific requirements. And I’ll talk more about how different use this functionality in different ways,
Finally, we talk about adding files, images and signatures. Although a lot of our customers get up to speed quickly with adding attachments to jobs. There is actually a lot more you can do with Okappy. You can add documents to customers, employees and subcontractors which could include things like copies of insurance certificates or contractors which means you always have information close to hand. In addition, there’s more ways you can retrieve that information which I’ll take you through in a bit.
1) Build your network on Okappy Portal+
Okappy is unique in that it’s always been built around a connected network approach. While other workforce management systems may work well internally, they quickly fall down when other companies are involved in the work.
And in this day and age, companies don’t work in isolation. With outsourcing, with specialist knowledge and equipment more and more companies collaborate. In fact, a Gartner research report said that by this year almost half or all work will be done by engineers and technicians not directly employed by you.
This can cause issues and we hear a lot about the duplication of information between different company’s systems. We hear about the hassle of providing reports to customers and their increasing demands to get the reports more quickly. We also here a about the mistakes, delays and missed jobs caused by having to copy information from one system to another.
With Okappy’s Portal+ network, you can connect to your customers and subcontractors. You can receive work from your customers or add work on their behalf and you can assign that work to your employees or subcontractors.
Everyone involved in that work can see the latest status of the job which means your customers don’t have to chase you and you don’t need to chase your employees or subcontractors.
It also means information is kept up to date, if your customers updated their contacts details the change is immediately available to you. Likewise, if you update your details that information is shared with your network.
Connecting to your customers
So how do you build your network.
To send a connect request, simply
- click the connection icon towards the top right of the screen
- Enter your customer’s details, and
- Send the invite.
They’ll be notified that you want to connect.
If they accept your invitation, they can log in and view their own account which is completely independent from yours. They can add jobs and assign them to you, or you can add jobs on their behalf which they can see. However, they can’t see any of your other jobs. They also can’t see which employees or subcontractors is doing the work. This ensure privacy and leaves you in control of the work.
Why connect to your customers on Okappy Portal+?
- Reduced duplication
- No more missed jobs
- Reduce chasing of emails and calls
- See the latest contact details
- Provide the best customer service
You can also save documents for your customers which will talk more about later.
You can add notes for your customer, get your invoices seen and paid quicker including taking payment.
Management gurus often talk about looking at your customers base to see which companies add to your profit and which add to your costs. Consultants will often tell you that 80% of your profits come from 20% of your customers. With Okappy you can run various reports on how to see which work you did for which companies.
You can also search for other companies on the Okappy network so you can actually find new customers or subcontractors when you’re ready to grow.
Connecting to your subcontractors on Okappy Portal+
You can connect to subcontractors in the same way that you connect to customers.
To send a connect request, simply
- Click the connection icon towards the top right of the screen
- Enter your subcontractors’ details, and
- Send the invite.
They’ll be notified that you want to connect.
Like customers they can only see the jobs that have been assigned to you. The information they see is also restricted, they cannot see who your customer is so you don’t need to worry that they’ll try and cut you out of the leep.
One important difference between customers and subcontractors is that subcontractors have to accept your invite before you can assign jobs to them. This is an important distinction as you want to know that your subcontractor has receive your work and is going to act on it.
Why connect to your subcontractors on Okappy Portal+
- Reduced duplication
- No more missed jobs
- Reduce chasing of emails and calls
- See the latest contact details
- Manage your subcontractors more easily
You can also save documents for your subcontractors which will talk more about later.
You can add notes for your subcontractor, get your invoices seen and paid quicker including taking payment.
You can also analyze how your subcontractors are working and compare them to your employees.
You can also search for other companies on the Okappy network so you can find new customers or subcontractors when you’re ready to grow.
2) Create job templates
Our second top tip is around creating job templates
This is a new feature on Okappy is the ability to create and edit your own job templates. Our aim with Okappy has always been to keep it simple so if you’re on the coal face you’re not having to think what fields you need to fill in and what information is required.
When you add and update a job it was always based around a template. But in the past, we had to create those templates for you manually which takes time, is costly to you and can lead to errors. A couple of years ago we started work on new functionality to enable you to easily create your own templates. Once your templates are created you can edit them.
We continue to develop the template builder to make it easier and simpler to use. We’ve also added new field types to the check sheets so you can choose from dropdowns, checkboxes, text areas and others.
We’ve seen lots of companies get creative in how they use the template functionality including adding templates for different reasons such as holiday check forms or even covid notifications. We’ve seen some complex check sheets including inventory checks and gas and electrical certificates.
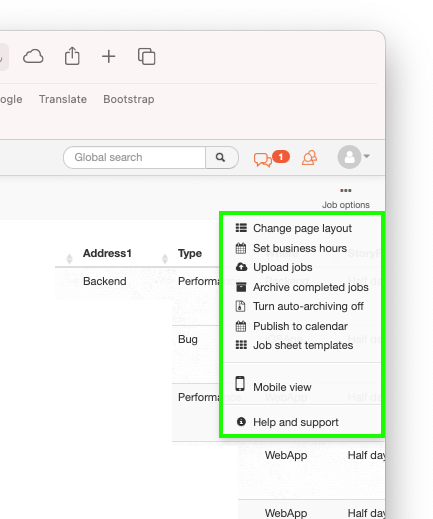
How to create job templates
To create a template
- Click job options from within the job’s dashboard.
- Select create new template
- You can then create a template scratch,
- copy an existing template including from our library templates, or
- purchase the configuration option in which case we’ll create the template for you.
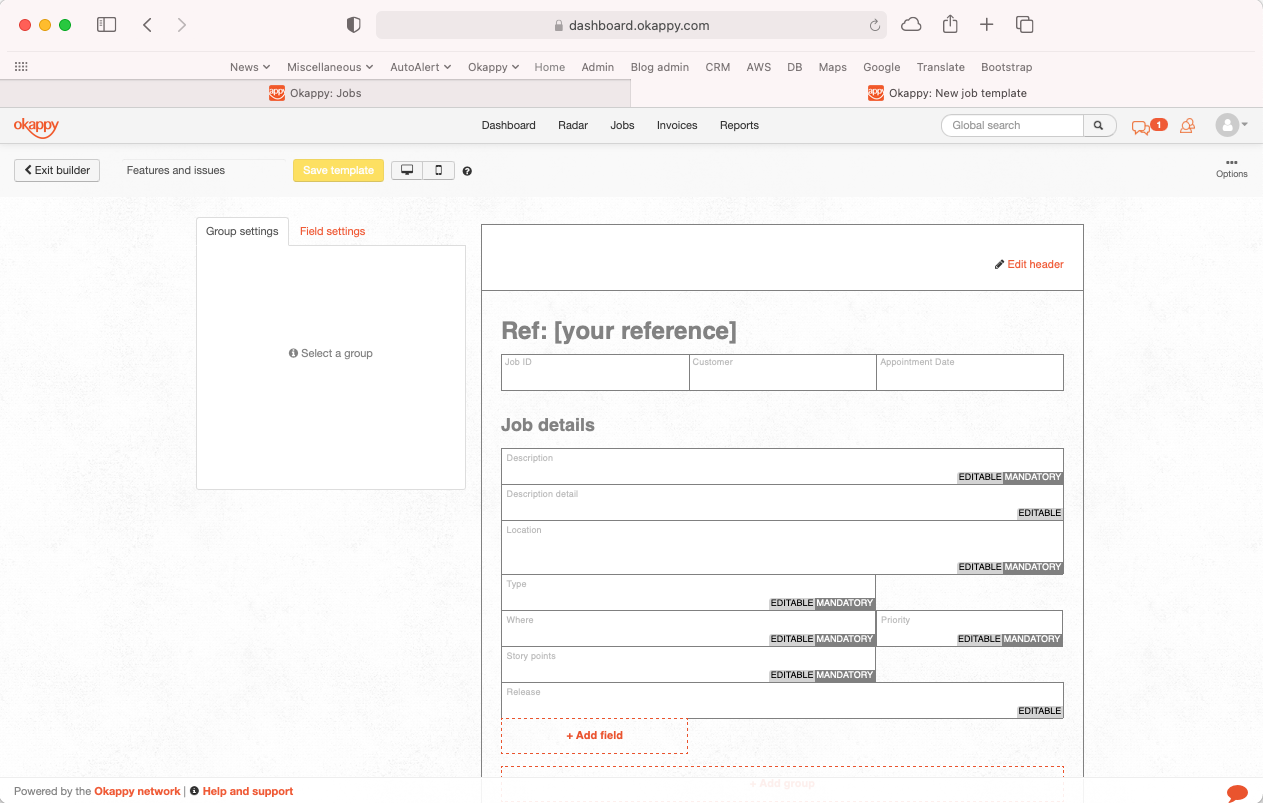
The template builder is split into 4 key sections.
You’ve got the header and footer which will be on all the jobs done with that template
You’ve got the template settings which includes things like what information is automatically pulled into the invoice and when the different job dashboard alerts start to flash
Then you have the main job section which is typically filled out when adding the job and can include things like the contact’s name, address and job description
Finally, you can add check sheets at various stages of the job. When you’re engineers first look at the job, when they have done the work and once the job has been complete.
There’s also lots of help and support including a step-by-step video on our support site > jobs > creating customer job templates.
Job templates builder
The template builder is split into 4 key sections.
- The header and footer which will be on all the jobs done with that template
- Template settings which includes things like what information is automatically pulled into the invoice and when the different job dashboard alerts start to flash
- The main job section which is typically filled out when adding the job and can include things like the contact’s name, address and job description
- Check sheets which can be added at various stages of the job. When your engineers first look at the job, when they have done the work and once the job has been complete.
3) Adding files, images, videos etc.
Our final top tip is about adding images, files and other attachments on Okappy
A lot of you will know that you add images, photos, videos, documents and signature to a job. This is used more and more to demonstrate to customers what has been done and provide information for future work.
It means the files are easily accessible and all in one place rather than having search through WhatsApp, email etc.
They are available in real-time so the office can see the files as soon as they’ve been updated, likewise the engineer can view the files from their phone or tablet.
Images can be added from the office or by your engineers out in the field.
They are available to everyone in real-time.
Add documents to a job
From the web
- To add documents to a job, simply click the three dots next to the relevant job
- A new window will be shown. You can drag and drop your file into that window or locate the file on your computer.
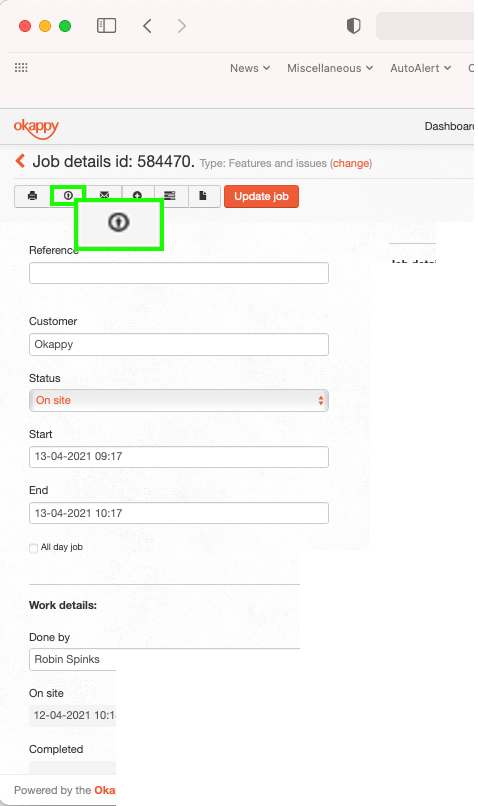
- You can also add a file from within a job. To do that click the upload file icon towards the top left of the screen.
- Then you can again either drag and drop your file or locate it
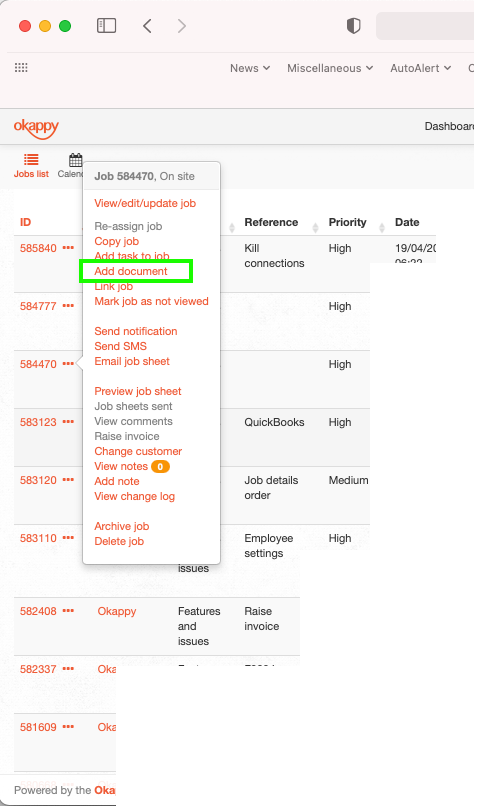
From within a job
- To add documents to a job, simply click the three dots next to the relevant job
- A new window will be shown. You can drag and drop your file into that window or locate the file on your computer.
- You can also add a file from within a job. To do that click the upload file icon towards the top left of the screen.
- Then you can again either drag and drop your file or locate it
Add a document from iOS
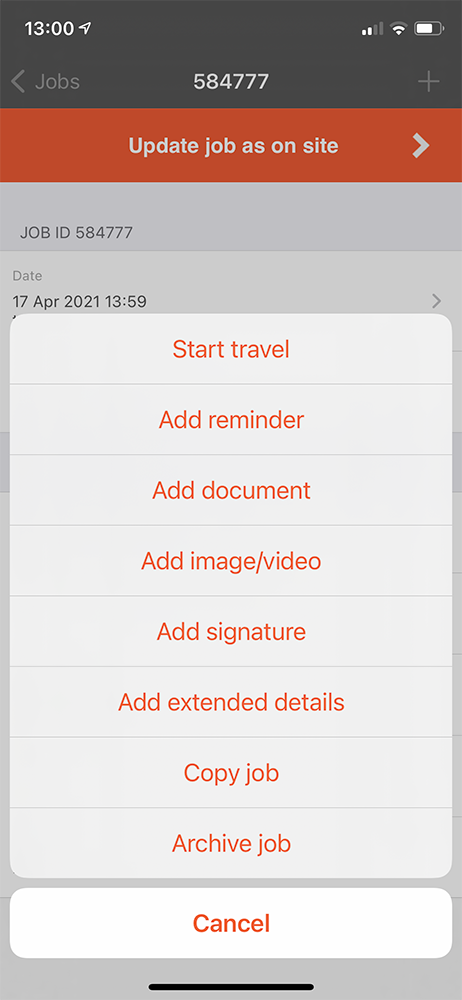
Your engineers can also add documents, files and images to a job when they are out and about. To do that,
- Select the job
- Click the plus icon
- Select Add document or Add photo.
You also have control over how the image is uploaded, Either in the background which allows you to carry on editing work or in line.
One thing to note that if you do upload the file in the background, if you close the app then how the image gets uploaded will depend on the phone rather than our app. Apple restricts uploads say if the battery is low or if the network is poor.
Adding documents on Android
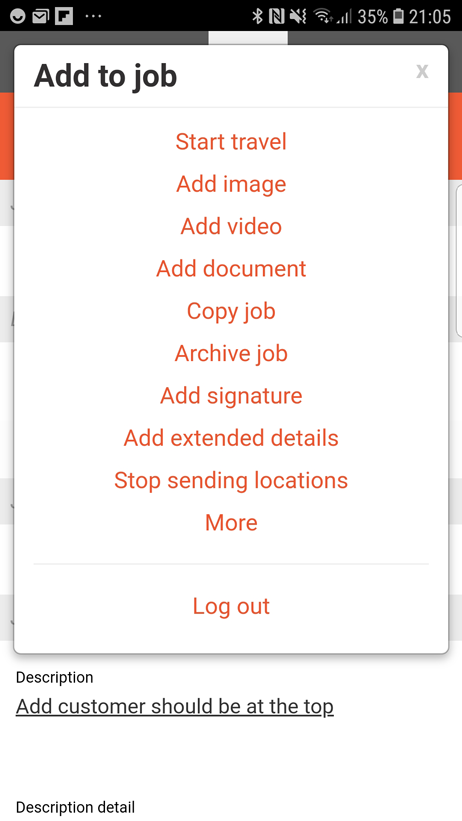
Android is like iOS apart from a few subtle differences. To upload a job on Android
- Again, select the job
- Click the Okappy icon this time
- Select Add document or Add photo.
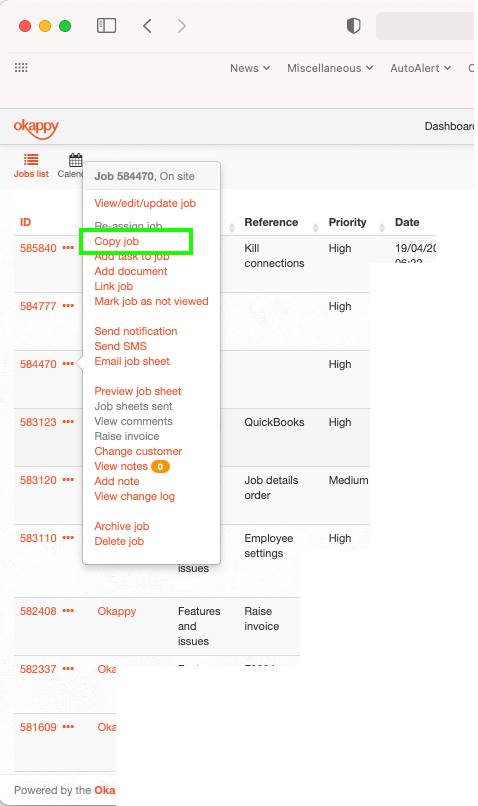
Copying jobs with documents
Once you have a document or attachment on a job. You can also copy the attachments when you’re copying the job. That makes it really easy to have a job which always has a specific document i..e, a RAMS doc
To do that, copy the job and ensure the Copy any attachments icon is selected.
Copying jobs with documents on iOS
Likewise on the mobile app to copy a job and any attachments
- Click the Plus icon
- Select Copy job
- Update the details
- Turn the Copy any attachments switch to on
Copying jobs with documents on Android
Likewise on the mobile app to copy a job and any attachments
- Click the Okappy icon
- Select Copy job
- Update the details
- Turn the Copy any attachments switch to on
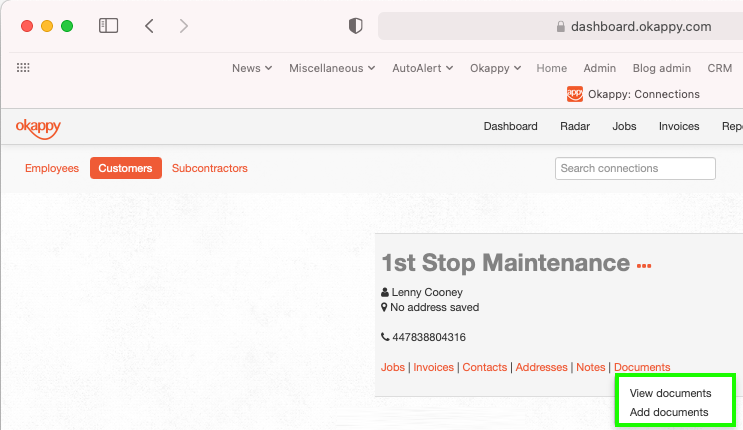
Adding documents to a customers record
You can also add documents to invoices and to your customers, subcontractors and employees.
To add a document to your customer.
- Go to the Connections screen
- Select Customer
- Find the relevant customer
- Click the Documents link
- Click Add documents.
You can also view any documents for that customer from the same link
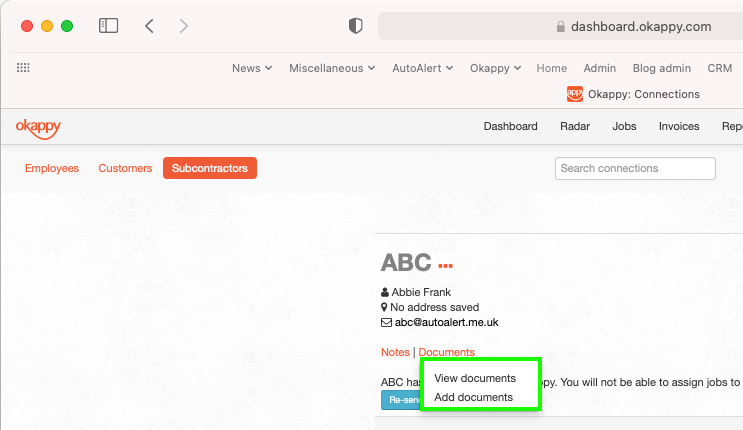
Adding documents to a subcontractors record
You can also add documents to invoices and to your customers, subcontractors and employees.
To add a document to your customer.
- Go to the Connections screen
- Select Subcontractor
- Find the relevant subcontractor
- Click the Documents link
- Click Add documents.
You can also view any documents for that subcontractor from the same link
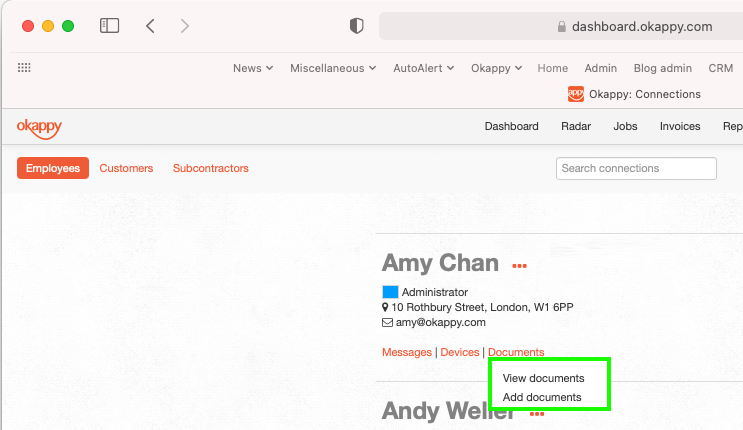
Adding documents to an employee record
You can also add documents to invoices and to your customers, subcontractors and employees.
To add a document to your customer.
- Go to the Connections screen
- Select Employees
- Find the relevant employee
- Click the Documents link
- Click Add documents.
You can also view any documents for that employee from the same link
Further help and support
- https://www.okappy.com/support-article/information-visibility
- https://www.okappy.com/support-article/employees-or-subcontractors-what-is-the-difference
View the webinar
Get the webinar slides
Leave your details above and we’ll send out a copy of the slides. We’re also interested to hear of any other topics you may like to hear about for future webinars.