The post Webinar – Top Reports for Growing Companies appeared first on Okappy.
]]>Join us for our next webinar on Wednesday 22nd September about Top Reports for Growing Companies.
More information coming soon…
Join us (and the Okappy community) on Wednesday 22nd September at 2pm for an exciting and very informative webinar. Remember to follow us on Eventbrite to ensure you don’t miss out on all our events.
The post Webinar – Top Reports for Growing Companies appeared first on Okappy.
]]>The post Webinar – Using Tracking to Grow Your Business appeared first on Okappy.
]]>Our webinar Using Tracking To Grow Your Business was held on the 21st July 2021.
Tracking with Okappy’s Portal+ is all about supporting, accompanying and protecting your employees or subcontractors to help you grow your business.
During this webinar we discussed
- the benefits of tracking
- the various options available for tracking
- what to look out to ensure locations are sent
The event was sold out, follow us on Eventbrite and be the first to hear about any future events.
Following is the text of what was discussed.
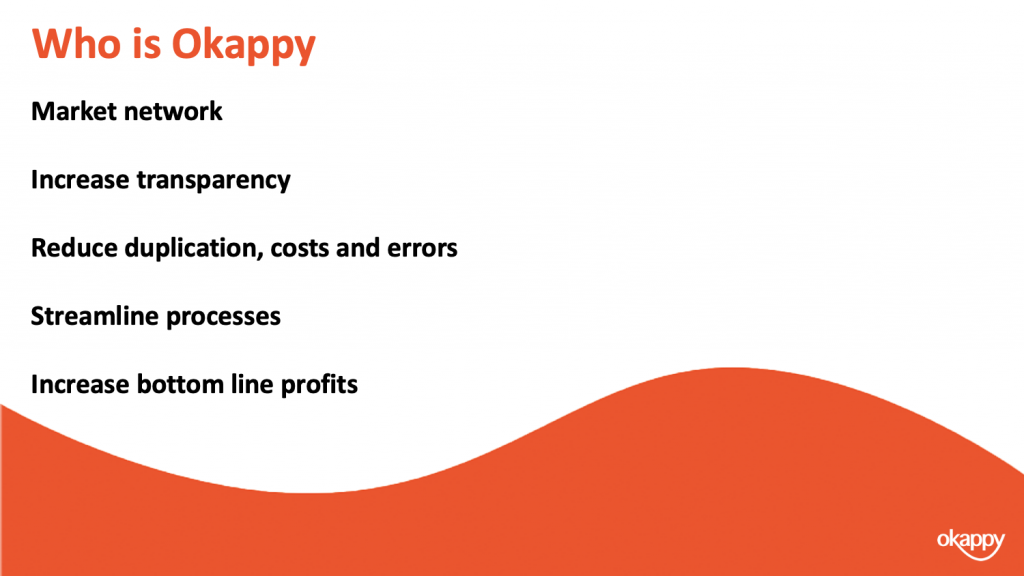
But first, for those of you who don’t know who Okappy is
Okappy is a business 2 business connected workforce management platform which applies social and market networking technology to a real business need. The need to communicate and collaborate with your employees who are often at different locations (and now more than ever). With your subcontractors and with your customers.
By connecting on Okappy, we’re helping the most forward looking and dynamic companies increase transparency, reduce duplication, costs and errors and increase efficiency. Ultimately making a significant contribution to bottom line profits.
With Okappy,
- you can connect to your employees, customers and subcontractors.
- Send and receive jobs
- See the status of those jobs as they’re updated by your engineers and subcontractors
- Raise your invoices at the touch of a button
You can also monitor and protect your employees and better schedule your jobs using GPS tracking. This is what I’ll be covering in detail today.
Okappy was born out of a vehicle tracking company a few years ago. I’ve got a story share which really highlighted to me how tracking can be beneficial to all employees rather than a big brother surveillance to be feared.
It was when I first started work, I used to go along with the installers and take the opportunity to see our customers.
I remember on one such visit a long time ago I was sat high up in the cab of an articulated lorry while the installer was wiring the tracking unit. As I looked out across the yard I saw one of the truckers come steaming over to his cab. He was a big meaty guy with tatoos all up his arm. I was dreading what he was going to say.
Anyway the next minute, the cab door swings open and he gets in. As he was extending his arm he I was expecting an earfull.
So I was taken by surprise when he said
Hey mate, I want to shake your hand. Since we started installing the trackers our lives have improved no end. Before we’d have the boss ringing up all the time asking where we were and why we weren’t at the next dropoff. Now it’s peace and quiet all the way. He knows where we are so he’s not constantly calling, we can just get on with the job. It’s bliss.
One of the key benefits of GPS tracking is that everyone can see the location of your engineers. This means less stress and hassle for the office trying to figure out where you are or whether you’re stuck in traffic. And it means your engineers can get on with their work without having to field lots of calls from the office.
Knowing where you’re guys are also means you can assign jobs to those guys who are the closest or near to where they live. This can dramatically save fuel and time if they’re not having to come into the office.
Depending on your tracking device you can also further save fuel through better monitoring of routes and idling times. One of the big costs, particular with large vehicles is the amount of fuel which is used when the vehicle is idling. They have big batteries so there is not need for them to idle, the driver can still use the power but often they just forget to turn the ignition off.
The other benefit we hear a lot about is the improvements to customer service. I’m sure some of you have had the experience of an irate customer ringing up because you’re engineer has not turned up. Without tracking this would often mean having to call the customer back whilst you tried to figure out where you’re guy is. With tracking you can see straight way his last know location, and depending on settings even whether he is stuck in traffic.
This means you can provide proactive response to your customer rather than fobbing them off and having to call back later
Lone worker protection is also important for many roles, it’s a legal requirement. Particularly if you’re guys are on their own, or if they’re in remote or difficult locations. They can set tracking whilst they are on site and send message back to base if there is a problem.
Having an audit log of when engineers get on site or leave site is also often critical. Some customers demand it, even where they don’t its often useful if weeks later there’s a dispute about an invoice and by that time what happened is long forgotten.
With Okappy you have control over how and when location information is sent.
The spectrum goes from the left with no tracking to having tracking on all the time. Depending on the tracking device or settings, that could be updated as often as every 15 seconds although every couple of minutes is generally enough.
If you don’t need the location all the time then you can leave tracking off by default but turn it on for a specific time i.e., when you’re guys are at a particular site.
Alternatively, you can store the location and time stamp every time a job is updated. This may be required by your own customer or it might be useful as an audit trail to answer questions or protect against disputes down the line.
So how do you set when locations are sent.
You have control over various settings from within the app and also from the web portal.
From within the app, to get to the settings screen, click the Okappy icon, More and then Tracking Settings.
The device name is what shows on the radar screen on the app and from the web. Please note that if the app is deleted and re-installed then this could result in you seeing the app twice. You can show, hide or delete apps and I’ll show you that in a sec.
You can also see the unique key which can help debug issues with the device and is also how the system determines whether it is a new device. Unfortunately with both Apple and Google really focusing on privacy nowadays the unique can change from time to time and that is why you may see multiple devices set up even though your only expecting one device to be set up.
If the device doesn’t have a network connection, then the device will store locations in memory and send them (from oldest to newest) once it has a connection. You can determine how many locations are saved before the app will start overwriting the oldest locations.
You can set whether the application sends its location based on time or distance. One thing to note, to converse power and reduce data, even if you choose to send based on time, if the device has not moved, then it the app won’t be allowed to send another location. This is determined by the operating system and is outside of the control of the app.
A couple of options which are not shown in the screenshot is to always track and to keep the application open so it doesn’t turn off when you’re not using it. This is useful if you’re using your hands but want to keep the display on so you can read job information or look out for updates.
From all the mobile apps you can see whether the device is trying to send its location or not by the colour of the Okappy icon.
On the left the app is trying to send its location, on the right its switched off.
To turn tracking on or off, click the Okappy icon then click Start or stop sending locations.
If the app is set to track by default, you can turn the tracking off say at the weekend. It will stop tracking but will start again one you turn the app back on.
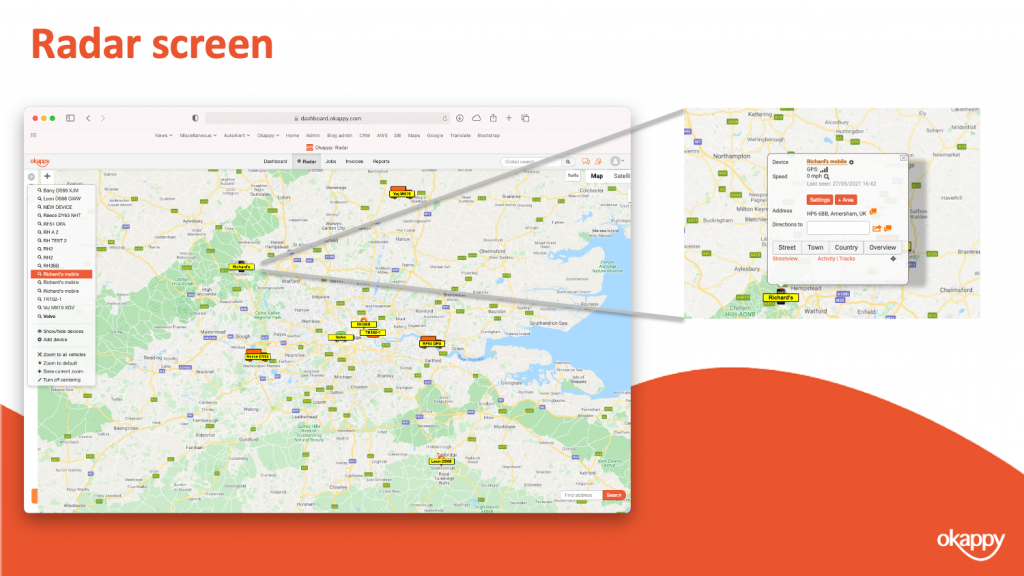
See the location on the radar screen – just to note, the radar screen shows the latest location. If the device hasn’t transmitted for whatever reason, and we’ll talk about some of those reasons in a bit then it will be the last known location of the device.
You can click on any of the devices to zoom in or out and you can also change tracking settings from there as well as delete or hide the device.
On the left you’ve got three icons. The top one in particular is useful. If you click on that you can see all your devices, hover over each of them to see when they last transmitted and click on the name to zoom into that devices location.
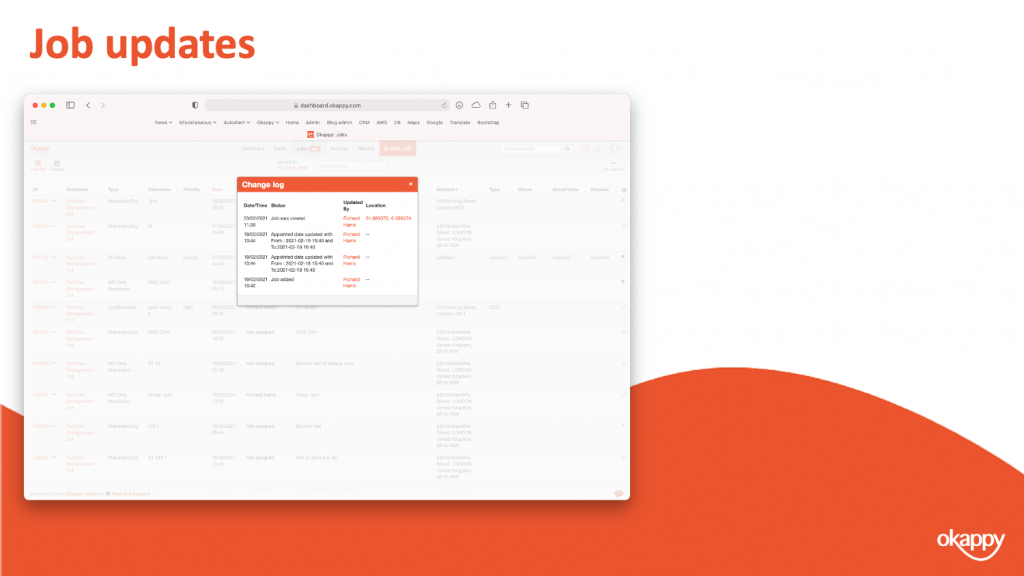
You can see the time and location where the job was updated.
Clicking on the location will open the location in Google maps.
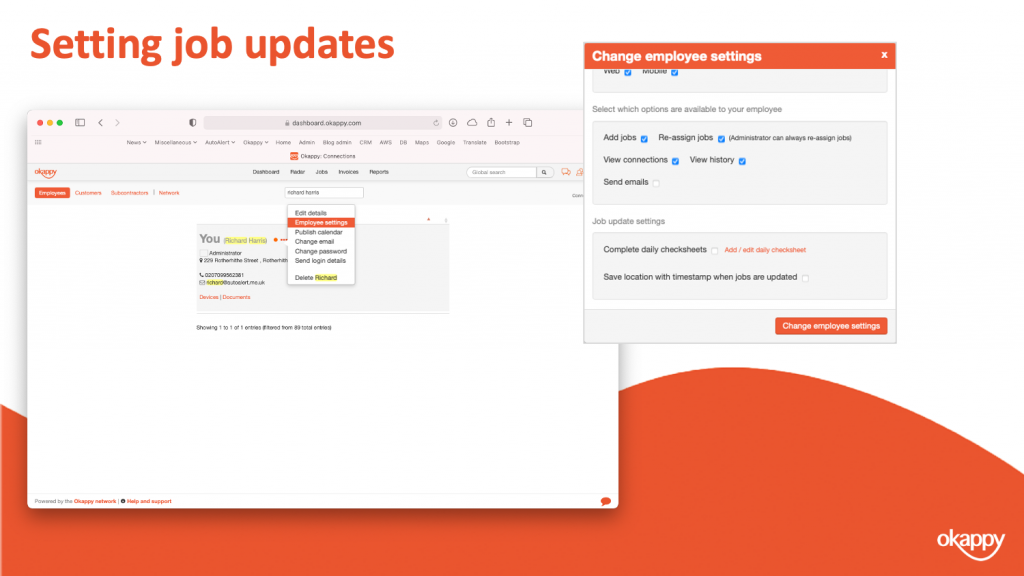
To turn the setting on or off.
- Click the connections icon at the top of the screen and then
- choose the Employee tab.
- Select your employee, and
- click Employee settings.
In the employee settings window, scroll down to where you see Save locations with timestamp when jobs are updated and check that on or off.
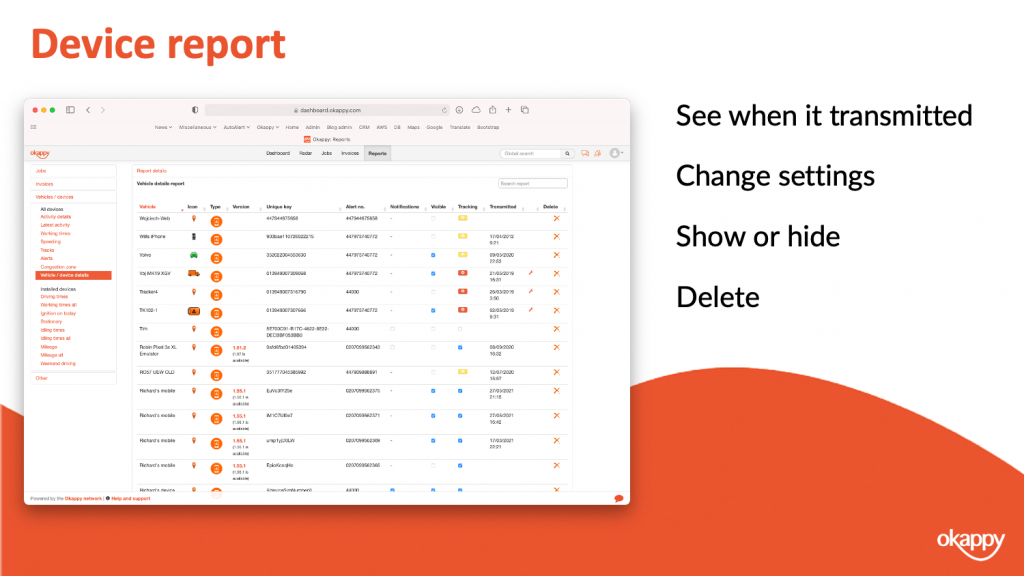
You’ve also got various reports on the web. Some of them are more relevant if you’ve got an installed device. The vehicles /device details report is useful if you want to know which devices are on your account and what their status is.
The device report shows all the devices on your account.
You can see the device type and version (and whether the software version it out of date)
You can see whether the device is visible on the map, you can check the box to show or hide it.
Depending on device type, you can also change the device settings from the report.
You can delete the device.
Note: Devices get created automatically by the system. So if you have deleted the device and it then sends its location, the system will add it back on to your account. This is also why you sometimes get multiple devices for the same person. If they are logging onto the app on different devices or if the devices unique identifier changes (which it can do for various reasons and more and more given the privacy updates that Apple in particular is pushing)
Privacy is a increasing important and is becoming increasing important and is one that both Apple and Google take seriously.
Our app will try and get the location and send the location but it is ultimately down to the phone. If you’re engineer has turned off permissions, if there is no network or if the battery is low then our app won’t be able to send its location.
We do have a handy troubleshooting guide which you can use, I’ll include a link to that at the end.
It’s also important to note that subcontractors aren’t tracked in Okappy. A subcontractor is a company and so could have multiple engineers working. However, if the option to store the location and timestamp is enable then this will get captured in the audit log.
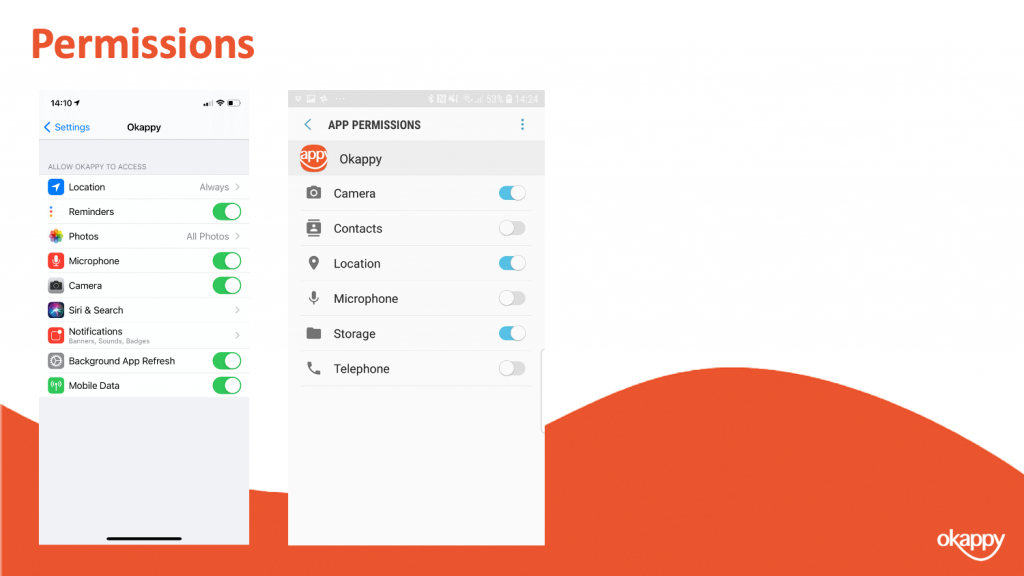
On iOS the easiest way to get to the app settings is from within Okappy.
- Click the Okappy icon,
- Select More and then,
- click Device Settings for App.
Android is a bit more convoluted and depends on your particular phone or version.
But if you open the settings apps, click on Apps and then find Okappy. Then you go into the all the settings from there. In particular ensure the permissions are all set as Ok.
Allowing all permissions makes is easier to see whats going on with your app.
To recap, we talked about some of the benefits of tracking i..e, reducing mileage and fuel costs, providing proactive customer service, increasing productivity of engineers through less interruption and also for lone worker protection
We talked about the different tracking options from no tracking to always tracking and a couple of options in between i.e., sending tracking locations for a period of time or when a job is updated
Finally we talked about some of the issues which may mean devices don’t transmit. Including low power, no gps, no network or a user turning off permissions which is becoming more and more prevalent with the changes that both Apple and Google have been introducing.
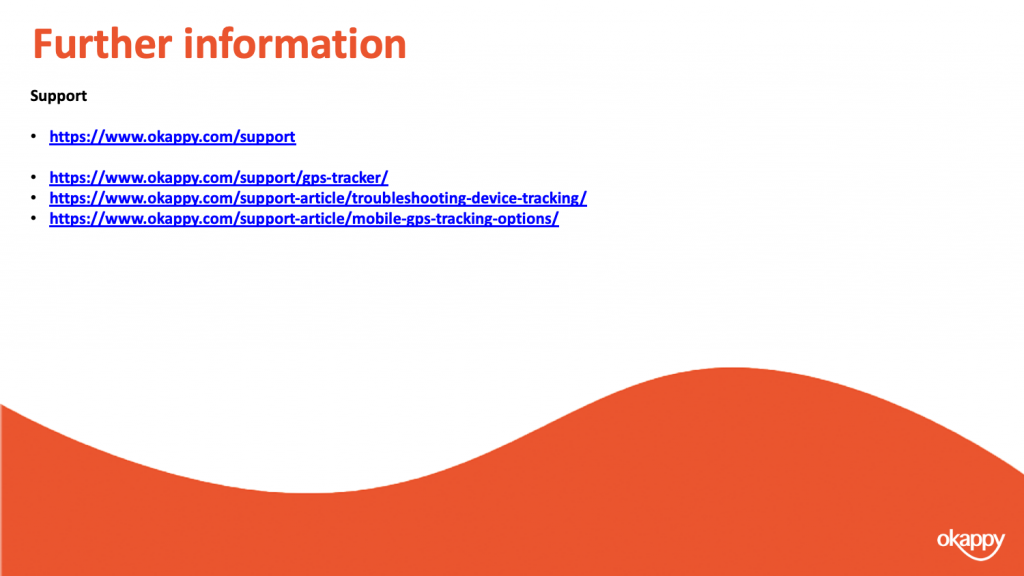
There’s lots of information on our help and support pages including help articles, questions and answers and videos.
Here’s some links to articles which we have covered today.
Thanks once again for attending our webinar. I hope you found it useful.
Our next topic is going to be about Advanced reporting on the 22nd September 2021.
Thank you!
View the webinar
Get the webinar slides
The post Webinar – Using Tracking to Grow Your Business appeared first on Okappy.
]]>The post Webinar – Using the Network to Grow Your Business appeared first on Okappy.
]]>Our webinar – Using The Network To Grow Your Business was held on the 23rd June 2021.
We were joined by Alexander Low of Lately.ai and Richard Harris of okappy.com.
Alex has over 15 years experience in sales & marketing at Michael Page, PwC and JLL across business services, accountancy, legal and commercial real estate. Alex applies his experiences to the 21st Century and advises Professional service firms on their Social strategy, Personal brand, value of networks and content creation.
Richard is the CEO and Co-founder of Okappy which was founded to transform industry through better collaboration and more connected processes. Richard previously worked for an award winning start up in fleet management sector and prior to that was a Management Consultant and Investment Banker. He has an Executive MBA from Cranfield School of Management.
Who is Okappy?
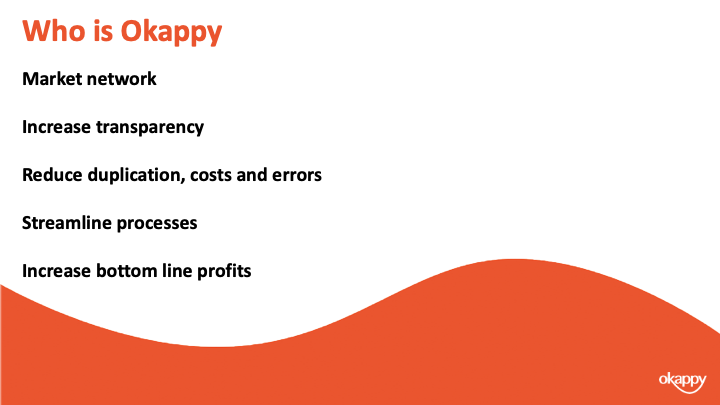
Okappy is a business 2 business connected workforce management platform which applies social and market networking technology to a real business need. Think Linkedin, Uber and Workforce Management merged into one communications and collaboration platform. Our aim is to help transform your industry through better communications and collaborate with your employees who are often at different locations (and now more than ever). With your subcontractors and with your customers.
By connecting on Okappy, the most forward looking and dynamic companies are increasing transparency and trust, reduce duplication, costs and errors and dramatically increasing efficiency. Ultimately we’re seeing companies being able to increase profits through extra capacity, reduced costs and being able to spend more time growing your business.
So we’ll talk about the network side of Okappy in a bit and how you can build your network on it. But you can also build your business using social media. Linkedin is currently one of the best networks to use in order to gain company insight and start conversations.
Introducing Alex Low

So without further ad do, I’d like to introduce you to Alex Low. He’s head of Enterprise Strategy and Operations at Lately.ai. Previously Alex worked in sales and marketing across various industries and now applies his experience to social strategy, personal branding and the value of networks.
So im delighted to have Alex join us today.
Nurturing your network on Okappy Portal+

First, why is software moving away from systems that work just work in house, forcing you to rely on clunky portals, emails or whatsapp to work with other companies. In the industries that we operate in, 50% or more of work is done by subcontractors. You all have customers, and more and more they’re demanding real-time information. That is why we’re seeing a shift to a more connected approach and is the reason we developed the Okappy network.
The benefits of using a more connected approach including.
- Increase transparency
With a connected approach, everyone can see what is happening in real –time. This means you don’t need to chase your subcontractor. They don’t need to chase their employee (or subcontractor).
Everyone knows what is happening as it happens.
- 2) Streamline processes / Reduce duplication
No more copying information between your customers system and your system. No more resorting to email or whatsappto get a subcontractor to do work.
With a connected network, information flows seamlessly from order maker right down to the end engineer. Whether he works for your company, for your subcontractor or for your subcontractors subcontractor.
In the old way, jobs would get missed, invoices would be displayed and customer service would be negatively impacted.
- Increase trust
All too often in the trades, in construction, in facilities management trust is no where to be seen. Beggar they neighbour approach leads to late payments, costs being passed down the chain and ultimately increased solvency.
Many businesses that we work with find that disputes over the amount invoiced can frequently cause delays. One common reason for this is when a worker and their client disagree over the amount of time a worker spent on site, or when the worker incurred a lateness penalty.
By having a computerised system that helps to record job details, view job status and automatically raise an invoice when the job is complete, this problem can be easily eliminated without you noticing it.
Okappy Job Management System gets rid of your excessive admin, ensures your jobs are updated as they happen and allows you to raise your invoice at the click of a button. Helping you get your invoice paid faster, ensuring no invoices are forgotten and reducing the risk of dispute.
- Eliminate the potential for disputes
Many businesses that we work with find that disputes over the amount invoiced can frequently cause delays. One common reason for this is when a worker and their client disagree over the amount of time a worker spent on site, or when the worker incurred a lateness penalty.
By having a computerised system that helps to record job details, view job status and automatically raise an invoice when the job is complete, this problem can be easily eliminated without you noticing it.
Okappy Job Management System gets rid of your excessive admin, ensures your jobs are updated as they happen and allows you to raise your invoice at the click of a button. Helping you get your invoice paid faster, ensuring no invoices are forgotten and reducing the risk of dispute.
Benefits of the Network

So how do you build your network.
To send a connection request, simply click the connection icon towards the top right of the screen.
Enter your customer’s details and send the invite.
They’ll be notified that you want to connect. If they accept your invitation, they can log in and view their own account which is completely independent from yours.
They can add jobs and assign them to you, or you can add jobs on their behalf which they can see. However, they can’t see any of your other jobs. They also can’t see which employees or subcontractors is doing the work. This ensure privacy and leaves you in control of the work.
Connecting To Your Customers

So how do you build your network.
To send a connection request, simply click the connection icon towards the top right of the screen.
Enter your customer’s details and send the invite.
They’ll be notified that you want to connect. If they accept your invitation, they can log in and view their own account which is completely independent from yours.
They can add jobs and assign them to you, or you can add jobs on their behalf which they can see. However, they can’t see any of your other jobs. They also can’t see which employees or subcontractors is doing the work. This ensure privacy and leaves you in control of the work.
Why connect to your customers?

To summarise, these are just some of the benefits of connecting to your customers.
- Reduced duplication
- No more missed jobs
- Reduce chasing of emails and calls
- See the latest contact details
- Provide the best customer service
Additional benefits of connecting to your customers

You can also save documents for your customers which will talk more about later.
You can add notes for your customer, get your invoices seen and paid quicker including taking payment.
Management gurus often talk about looking at your customers base to see which companies add to your profit and which add to your costs. Consultants will often tell you that 80% of your profits come from 20% of your customers. With Okappy you can run various reports on how to see which work you did for which companies.
You can also search for other companies on the Okappy network so you can actually find new customers or subcontractors when you’re ready to grow.
Connecting to your subcontractors

You can connect to subcontractors in the same way that you connect to customers.
To send a connect request, simply click the connection icon towards the top right of the screen.
Enter your subcontractors’ details and send the invite.
They’ll be notified that you want to connect.
Like customers they can only see the jobs that have been assigned to you. The information they see is also restricted, they cannot see who your customer is so you don’t need to worry that they’ll try and cut you out of the loop.
One important difference between customers and subcontractors is that subcontractors have to accept your invite before you can assign jobs to them. This is an important distinction as you want to know that your subcontractor has receive your work and is going to act on it.
Why connect to your subcontractors?

To summaries, these are just some of the benefits of connecting to your customers.
- Reduced duplication
- No more missed jobs
- Reduce chasing of emails and calls
- See the latest contact details
- Bring your subcontractors into the loop
Additional benefits of connecting to your subcontractors

You can also save documents for your subcontractors which will talk more about later.
You can add notes for your subcontractor, get your invoices seen and paid quicker including taking payment.
You can also analyze how your subcontractors are working and compare them to your employees.
You can also search for other companies on the Okappy network so you can find new customers or subcontractors when you’re ready to grow.
Further information

There’s lots of information on our help and support pages including the following help articles. There’s also lots of previously asked questions and answers in our forums and short explanatory videos.
https://www.okappy.com/support
https://www.okappy.com/support-article/information-visibility/
https://www.okappy.com/support-article/employees-or-subcontractors-what-is-the-difference
Thanks for attending our webinar

Thanks once again for attending our webinar. I hope you found it useful.
Please connect with Okappy on twitter at @ok_appy or follow us on LinkedIn at https://www.linkedin.com/company/okappy-ltd-
You can also follow Alex Low on LinkedIn at https://www.linkedin.com/in/alexanderlow/
View the webinar
Get the webinar slides
The post Webinar – Using the Network to Grow Your Business appeared first on Okappy.
]]>The post Webinar – Getting your invoices paid on time appeared first on Okappy.
]]>Our webinar – Raising invoices and Getting Paid Quicker was on the 19th May 2021.
We were joined by Paul Layte FCA from Next Level Business. Paul is a business growth specialist who has founded several high profile corporate start-ups and has worked in board level roles in four different listed businesses. A chartered accountant by background with a passion for growing businesses of all shapes and sizes which he now does through his own digital chartered accountancy firm Next Level Business where Paul, as the founder and CEO also provides advisory and CFO support to many ambitious small businesses ans SME’s.
Who is Okappy?

Okappy is a business 2 business connected workforce management platform which applies social and market networking technology to a real business need. The need to communicate and collaborate with your employees who are often at different locations (and now more than ever). With your subcontractors and with your customers.
Okappy helps the most forward looking and dynamic companies increase transparency, reduce duplication, costs and errors and increase efficiency. Ultimately making a significant contribution to bottom line profits.
With Okappy, you can connect to your employees, customers and subcontractors.
Send and receive jobs.
See the status of those jobs as they’re updated by your engineers and subcontractors
Then raise your invoices at the touch of a button.
It’s those first three points which I am touching on today.
Late payments are an issue
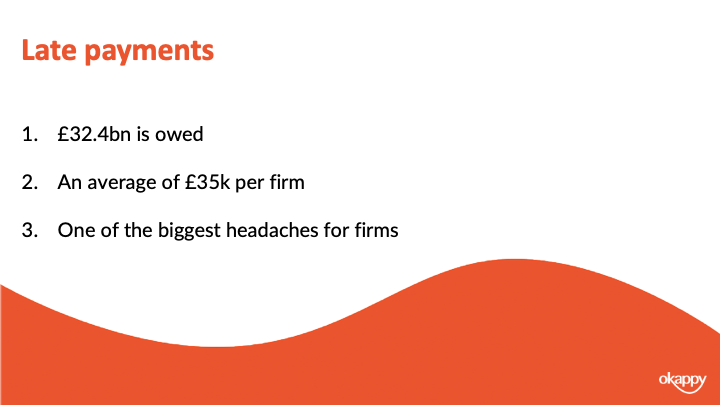
Late payments are an issue in the UK. Particularly in some of the sectors that customers work in. i..e, construction, facilities management, housing.
Research by BAC, the payment organization, suggests that £32.4 billion is owed which equates to about £35k for the average smaller enterprise.
Late payments are due to a number of factors. What gets the most headlines is large companies delaying payment to improve their own cash flow. But a lot is also due to your own processes. One of the big changes we see in companies that move to digital workforce management is the speed in which invoices can be generated. Systems are obviously part of it, but processes are also key which I’m sure Paul will talk about.
I think what we want you to take away is that late payments can be a headache but there is a lot you can do about it to make the whole process smoother, more efficient and much quicker.
Introducing Paul Layte, Next Level Business
On that note, I’m going to introduce you to Paul.
Paul, CEO and founder of Next Level Business, the Growth Accountants. He has founded, grown and exited several high-profile corporate startups in the telecoms and technology sectors.
He’s worked in board level roles in four different listed businesses and been a non-executive director and chairman of several smaller companies.
Like me, Paul is a keen motorsports enthusiast, Paul likes rugby and reminiscing about past sporting glories in the swimming pool. So maybe that’s a question you can ask him about at the end.
Invoicing Top Tips
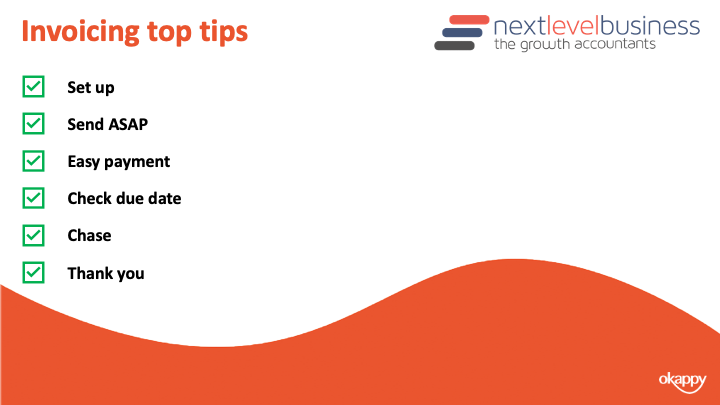
When you’re onboarding a customer, ensure they are set up correctly. You know what information is required on their invoices.
Send your invoices as soon as possible. A lot of delays are actually caused by the invoice not going out in the first place.
Ensure it is easy for your customer to pay your invoice. Ensure your bank details are correct, any additional such as IBAN numbers are included and that your business name matches your bank account name.
Also offer different options for your customers. Can they pay by BACs, credit card or debit card.
Monitor the due date of your invoices. And ensure you give your customer a call a week before the invoice is due. This ensures that everything is in order before they attempt payment.
This also entitles you to chase your invoices as soon as it is overdue. If you chase the day after the due date, then your customer will learn that you will always follow up on overdue invoices. If they are looking to delay payments then it’s likely they will delay the invoices from customers they haven’t heard from rather than the ones that make the most noise.
Finally once your customer has paid your invoice. Don’t forget to thank them.
Ensuring Your Invoice has been raised in Okappy
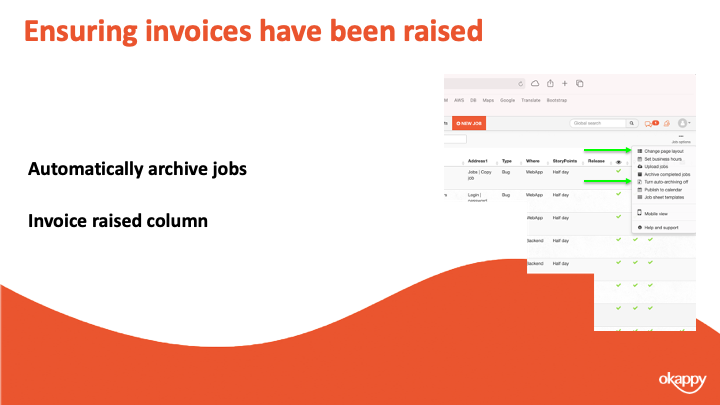
One of the first decision companies make when joining Okappy is how to put in a control to ensure that you have raised your invoices.
A lot of companies we speak to talk about the difficulty of getting job sheets back from their guys, understanding what has been done and then raising an invoice in a timely manner. Particular when companies rely on paperwork or spreadsheets it’s too easy to forget to raise an invoice and we certainly hear that a lot.
With Okappy, there are 2 ways you can keep on top of that process and ensure an invoice has been raised.
1) The first way is to automatically archive jobs once the invoice has been raised. This way you can see at a glance that if there are completed jobs on your dashboard then an invoice hasn’t been raised.
2) The second way is to add the invoiced column to your dashboard. That way you can see a tick once the invoice has been raised.
It’s up to you which process you use, most go with the first as it keeps the dashboard cleaner and helps you see the wood from the trees.
Raising invoices in Okappy

The second step in using a system is to determine how you can raise an invoice.
With Okappy, there’s various ways. You can raise an invoice from a job
You can raise it from a quote or you can raise a miscellaneous invoice.
One thing to note with the network, you can also receive invoices from your subcontractors or suppliers. That includes our invoices to you.
Raising invoices from a job
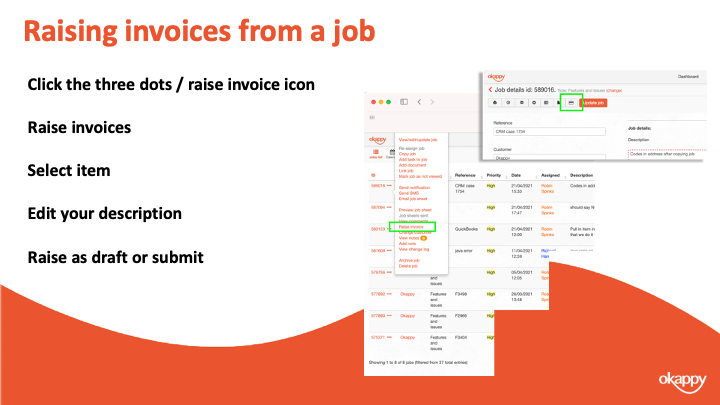
To raise an invoice from a job
- Click the three dots next to your job
- Select Raise invoices
- Select item (product or service)
- Edit your description
- Raise as draft or submit
Raising invoices from a Quote
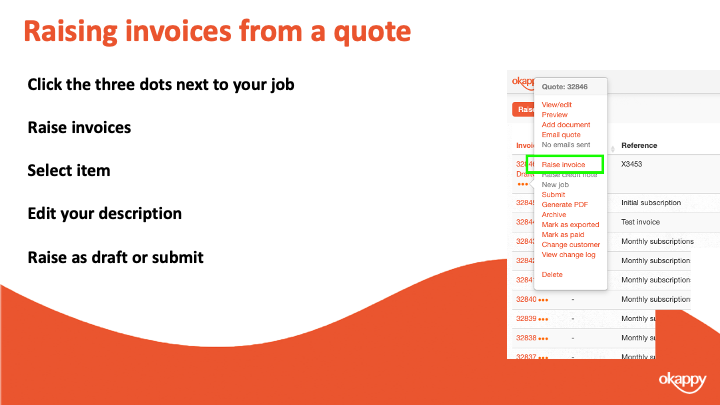
To raise an invoice from a quote
- Click the three dots next to your job
- Select Raise invoices
- Select item (product or service)
- Edit your description
- Raise as draft or submit
Raising miscellaneous invoices
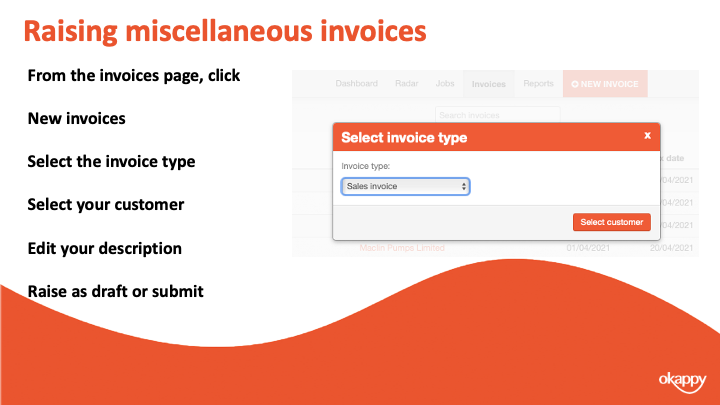
To raise a miscellaneous invoice
- Click the three dots next to your job
- Select Raise invoices
- Select item (product or service)
- Edit your description
- Raise as draft or submit
Submitting your invoices
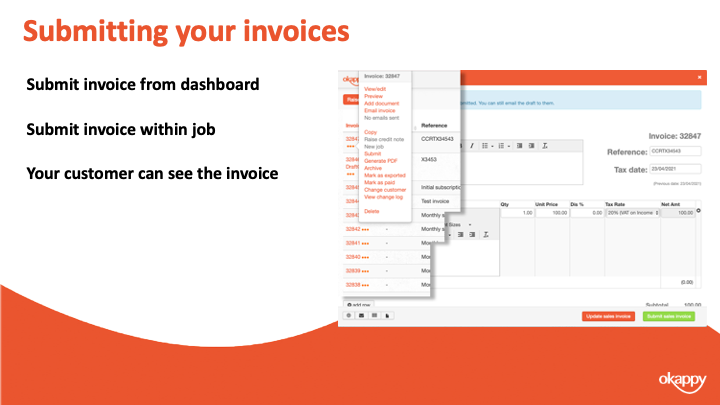
Submitting your invoices.
Changing your invoice from Draft to Submitted means that your customer can view your invoice and pay it (depending on your settings)
Seeing when your invoice has been paid
One thing Paul mentioned was being on top of which invoices have been paid. With Okappy you can look at it at a granular level with each invoice. You can also see how much is owed at a customer level.
The first thing to note is how the invoices actually get marked as paid. There’s three ways this can be done.
- You can manually mark the invoice as paid. To do that click the three dots next to the relevant invoice and click Mark as paid
- If you are using Xero and it’s connected to Okappy, then marking the invoice as paid within Xero will also mark the invoice as paid within Okappy automatically.
- The final way that invoices get marked as paid is if they are paid through Okappy’s own payment gateway. I’ll talk more about that in a bit, but if a customer pays an invoice via Okappy then you will see that the invoice has been paid and when. You can also set up email alerts to notify that an invoice has been paid.
Once an invoice has been marked as paid then this can be seen in three areas.
You can see it in your invoices dashboard, the paid column towards the right of the screen.
You can see it when raising a job. When you select a customer, their outstanding balance is shown which is the value of all invoices raised less those which have been paid.
There’s also a couple of reports – the invoices paid report and the outstanding invoices report which shows which invoices have been paid or not.
Receiving payments through Okappy
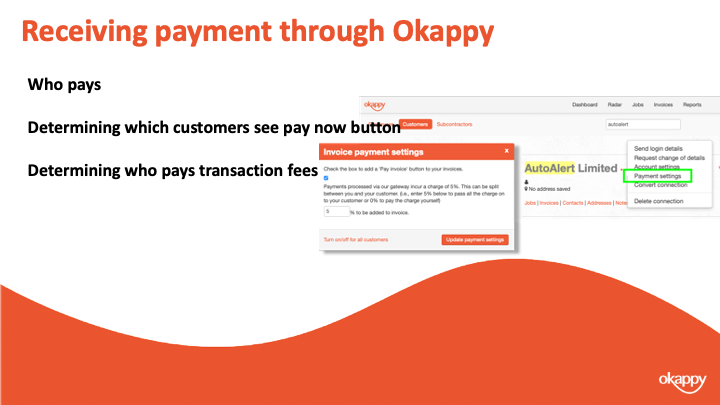
Paul mentioned about making it easy for your customer to pay you.
If you are taking payments through BACS or direct, then ensure your invoice template is updated with all the correct details.
You also have the option to take payment through Okappy. To do this, you simply enable the payment button on your invoices. When a customer clicks the button they’ll be taken to our payment gateway where they can make a secure payment to cover your invoice.
You can determine which customers the button shows for, you can show it on all your invoices or not show it all.
To change the setting for all customers, go to invoice options and then select the payment button link.
To change the settings for a specific customer. Go to the connections screen, find the relevant customer and click Payment settings
The first checkbox determines whether the Pay invoice button shows or not.
You can also set who pays the transaction charge. It can be added to the invoice in which case your customers who pays. It can be taken off the invoices in which case you get the amount of the invoice less the transaction charge. Or you can split the payment between yourself and your customer.
A quick recap
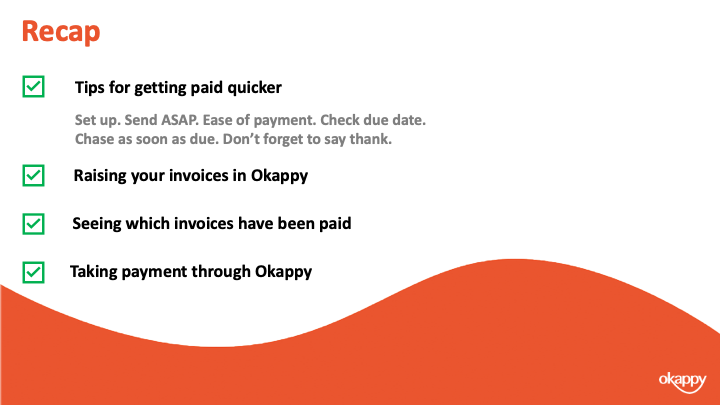
We talked about tips for getting paid quicker including ensure the setup of your customer is correct, ensure invoices are sent in a timely manner and keep an eye on the due date.
Chase as soon as the invoice is due and don’t forget to say thank you
We showed you three ways to raise your invoices on Okappy. From a job, from a quote and a miscellaneous invoice.
We showed various ways that you could see whether an invoice has been paid or the value of all invoices outstanding.
Finally we discussed using the pay now functionality from within Okappy to automate your process and make it easier for your customer to pay your invoices.
Further information and support
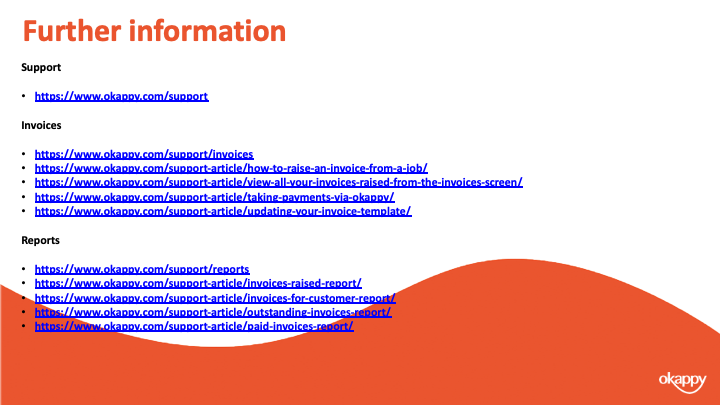
There’s lots of information on our help and support pages including help articles, questions and answers and videos.
Here’s some links to articles which we have covered today.
https://www.okappy.com/support
Invoices
https://www.okappy.com/support/invoices
https://www.okappy.com/support-article/how-to-raise-an-invoice-from-a-job/
https://www.okappy.com/support-article/view-all-your-invoices-raised-from-the-invoices-screen/
https://www.okappy.com/support-article/taking-payments-via-okappy/
https://www.okappy.com/support-article/updating-your-invoice-template/
Reports
https://www.okappy.com/support/reports
https://www.okappy.com/support-article/invoices-raised-report/
https://www.okappy.com/support-article/invoices-for-customer-report/
https://www.okappy.com/support-article/outstanding-invoices-report/
https://www.okappy.com/support-article/paid-invoices-report/
A number of short, self explanatory videos are also available.
Thanks for attending our webinar
Thanks once again for attending our webinar. I hope you found it useful.
Please connect with Okappy on twitter at @ok_appy or follow us on LinkedIn at https://www.linkedin.com/company/okappy-ltd-
You can also follow Next Level Business at on twitter at @_nlbusiness or on LinkedIn at https://www.linkedin.com/company/next-level-business
View the webinar
Get the webinar slides
The post Webinar – Getting your invoices paid on time appeared first on Okappy.
]]>The post Webinar – Top things you didn’t know about Okappy appeared first on Okappy.
]]>Our Webinar on Wednesday 21st April at 2pm covered three things you might not know about Okappy.
- How to build your network on Okappy
- Creating and editing your own job templates
- Adding files, images and other documents to the system
The webinar lasts for 30 minutes during which time you’ll hopefully takeaway some nifty tips you can use to get the most from Okappy’s Portal+.
Introducing Okappy
Okappy is a business 2 business connected workforce management platform which applies social and market networking technology to a real business need. The need to communicate and collaborate with your employees who are often at different locations (and now more than ever). With your subcontractors and with your customers.
Okappy helps the most forward looking and dynamic companies increase transparency, reduce duplication, costs and errors and increase efficiency. Ultimately making a significant contribution to bottom line profits.
With Okappy, you can connect to your employees, customers and subcontractors. Send and receive jobs and see the status of those jobs as they’re updated by your engineers and subcontractors out in the field.
Once the job is complete, you can raise your invoices at the touch of a button.
Top 3 tips to get the most from Okappy
- Building your network on Okappy Portal+
- Creating and editing your own job templates
- Adding files, images, signatures and other documents
We chose these three top tips as that’s where we get the most interest.
People are interested in the network as it’s a new way of doing business. It’s helping the most forward looking for companies reduce duplication and errors. It’s helping them provide the best customer service and real time reporting to their own customers and it’s helping them streamline their processes when managing employees and subcontractors.
People are interested in building their own templates. It’s a relatively new feature and allows companies to really fit Okappy around their specific requirements. And I’ll talk more about how different use this functionality in different ways,
Finally, we talk about adding files, images and signatures. Although a lot of our customers get up to speed quickly with adding attachments to jobs. There is actually a lot more you can do with Okappy. You can add documents to customers, employees and subcontractors which could include things like copies of insurance certificates or contractors which means you always have information close to hand. In addition, there’s more ways you can retrieve that information which I’ll take you through in a bit.
1) Build your network on Okappy Portal+
Okappy is unique in that it’s always been built around a connected network approach. While other workforce management systems may work well internally, they quickly fall down when other companies are involved in the work.
And in this day and age, companies don’t work in isolation. With outsourcing, with specialist knowledge and equipment more and more companies collaborate. In fact, a Gartner research report said that by this year almost half or all work will be done by engineers and technicians not directly employed by you.
This can cause issues and we hear a lot about the duplication of information between different company’s systems. We hear about the hassle of providing reports to customers and their increasing demands to get the reports more quickly. We also here a about the mistakes, delays and missed jobs caused by having to copy information from one system to another.
With Okappy’s Portal+ network, you can connect to your customers and subcontractors. You can receive work from your customers or add work on their behalf and you can assign that work to your employees or subcontractors.
Everyone involved in that work can see the latest status of the job which means your customers don’t have to chase you and you don’t need to chase your employees or subcontractors.
It also means information is kept up to date, if your customers updated their contacts details the change is immediately available to you. Likewise, if you update your details that information is shared with your network.
Connecting to your customers
So how do you build your network.
To send a connect request, simply
- click the connection icon towards the top right of the screen
- Enter your customer’s details, and
- Send the invite.
They’ll be notified that you want to connect.
If they accept your invitation, they can log in and view their own account which is completely independent from yours. They can add jobs and assign them to you, or you can add jobs on their behalf which they can see. However, they can’t see any of your other jobs. They also can’t see which employees or subcontractors is doing the work. This ensure privacy and leaves you in control of the work.
Why connect to your customers on Okappy Portal+?
- Reduced duplication
- No more missed jobs
- Reduce chasing of emails and calls
- See the latest contact details
- Provide the best customer service
You can also save documents for your customers which will talk more about later.
You can add notes for your customer, get your invoices seen and paid quicker including taking payment.
Management gurus often talk about looking at your customers base to see which companies add to your profit and which add to your costs. Consultants will often tell you that 80% of your profits come from 20% of your customers. With Okappy you can run various reports on how to see which work you did for which companies.
You can also search for other companies on the Okappy network so you can actually find new customers or subcontractors when you’re ready to grow.
Connecting to your subcontractors on Okappy Portal+
You can connect to subcontractors in the same way that you connect to customers.
To send a connect request, simply
- Click the connection icon towards the top right of the screen
- Enter your subcontractors’ details, and
- Send the invite.
They’ll be notified that you want to connect.
Like customers they can only see the jobs that have been assigned to you. The information they see is also restricted, they cannot see who your customer is so you don’t need to worry that they’ll try and cut you out of the leep.
One important difference between customers and subcontractors is that subcontractors have to accept your invite before you can assign jobs to them. This is an important distinction as you want to know that your subcontractor has receive your work and is going to act on it.
Why connect to your subcontractors on Okappy Portal+
- Reduced duplication
- No more missed jobs
- Reduce chasing of emails and calls
- See the latest contact details
- Manage your subcontractors more easily
You can also save documents for your subcontractors which will talk more about later.
You can add notes for your subcontractor, get your invoices seen and paid quicker including taking payment.
You can also analyze how your subcontractors are working and compare them to your employees.
You can also search for other companies on the Okappy network so you can find new customers or subcontractors when you’re ready to grow.
2) Create job templates
Our second top tip is around creating job templates
This is a new feature on Okappy is the ability to create and edit your own job templates. Our aim with Okappy has always been to keep it simple so if you’re on the coal face you’re not having to think what fields you need to fill in and what information is required.
When you add and update a job it was always based around a template. But in the past, we had to create those templates for you manually which takes time, is costly to you and can lead to errors. A couple of years ago we started work on new functionality to enable you to easily create your own templates. Once your templates are created you can edit them.
We continue to develop the template builder to make it easier and simpler to use. We’ve also added new field types to the check sheets so you can choose from dropdowns, checkboxes, text areas and others.
We’ve seen lots of companies get creative in how they use the template functionality including adding templates for different reasons such as holiday check forms or even covid notifications. We’ve seen some complex check sheets including inventory checks and gas and electrical certificates.
How to create job templates
To create a template
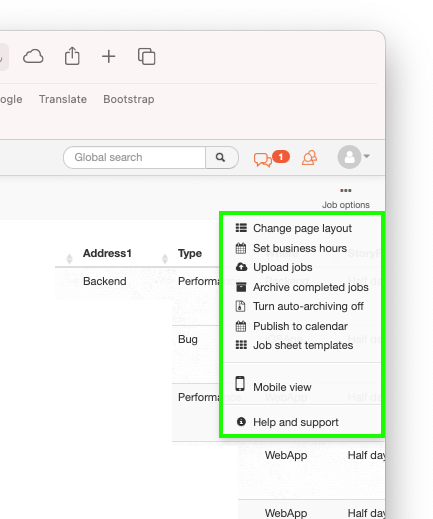
- Click job options from within the job’s dashboard.
- Select create new template
- You can then create a template scratch,
- copy an existing template including from our library templates, or
- purchase the configuration option in which case we’ll create the template for you.
The template builder is split into 4 key sections.
You’ve got the header and footer which will be on all the jobs done with that template
You’ve got the template settings which includes things like what information is automatically pulled into the invoice and when the different job dashboard alerts start to flash
Then you have the main job section which is typically filled out when adding the job and can include things like the contact’s name, address and job description
Finally, you can add check sheets at various stages of the job. When you’re engineers first look at the job, when they have done the work and once the job has been complete.
There’s also lots of help and support including a step-by-step video on our support site > jobs > creating customer job templates.
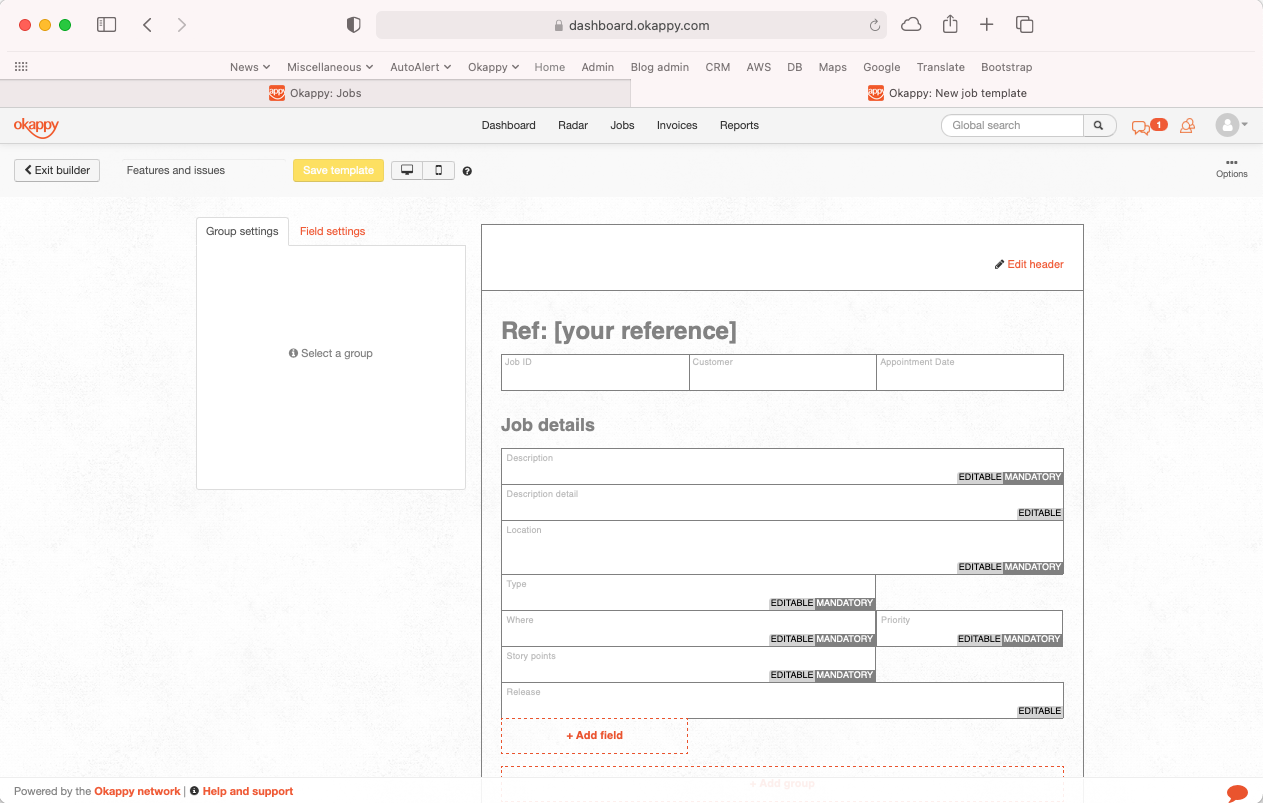
Job templates builder
The template builder is split into 4 key sections.
- The header and footer which will be on all the jobs done with that template
- Template settings which includes things like what information is automatically pulled into the invoice and when the different job dashboard alerts start to flash
- The main job section which is typically filled out when adding the job and can include things like the contact’s name, address and job description
- Check sheets which can be added at various stages of the job. When your engineers first look at the job, when they have done the work and once the job has been complete.
3) Adding files, images, videos etc.
Our final top tip is about adding images, files and other attachments on Okappy
A lot of you will know that you add images, photos, videos, documents and signature to a job. This is used more and more to demonstrate to customers what has been done and provide information for future work.
It means the files are easily accessible and all in one place rather than having search through WhatsApp, email etc.
They are available in real-time so the office can see the files as soon as they’ve been updated, likewise the engineer can view the files from their phone or tablet.
Images can be added from the office or by your engineers out in the field.
They are available to everyone in real-time.
Add documents to a job
From the web
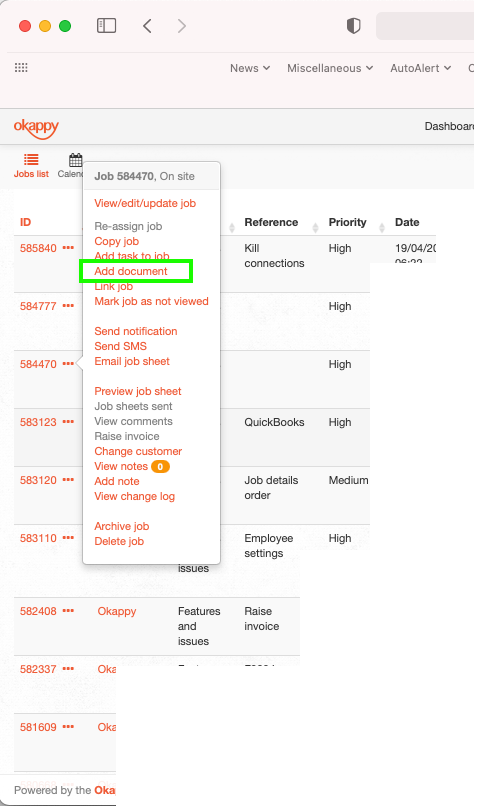
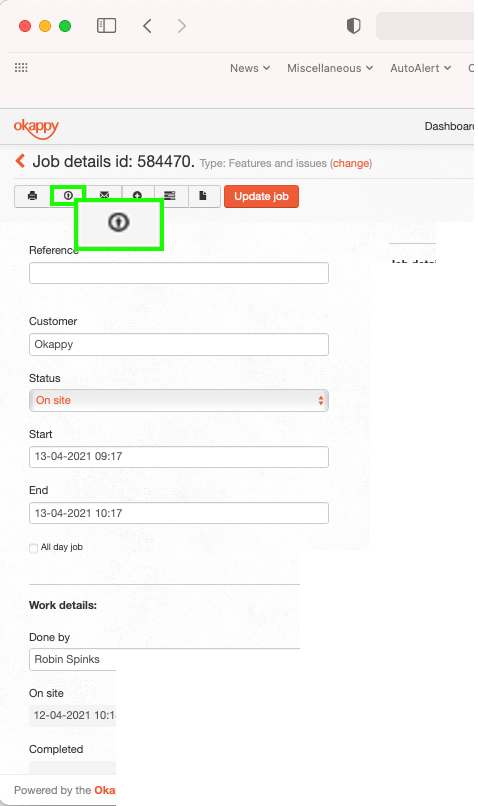
- To add documents to a job, simply click the three dots next to the relevant job
- A new window will be shown. You can drag and drop your file into that window or locate the file on your computer.
- You can also add a file from within a job. To do that click the upload file icon towards the top left of the screen.
- Then you can again either drag and drop your file or locate it
From within a job
- To add documents to a job, simply click the three dots next to the relevant job
- A new window will be shown. You can drag and drop your file into that window or locate the file on your computer.
- You can also add a file from within a job. To do that click the upload file icon towards the top left of the screen.
- Then you can again either drag and drop your file or locate it
Add a document from iOS
Your engineers can also add documents, files and images to a job when they are out and about. To do that,
- Select the job
- Click the plus icon
- Select Add document or Add photo.
You also have control over how the image is uploaded, Either in the background which allows you to carry on editing work or in line.
One thing to note that if you do upload the file in the background, if you close the app then how the image gets uploaded will depend on the phone rather than our app. Apple restricts uploads say if the battery is low or if the network is poor.
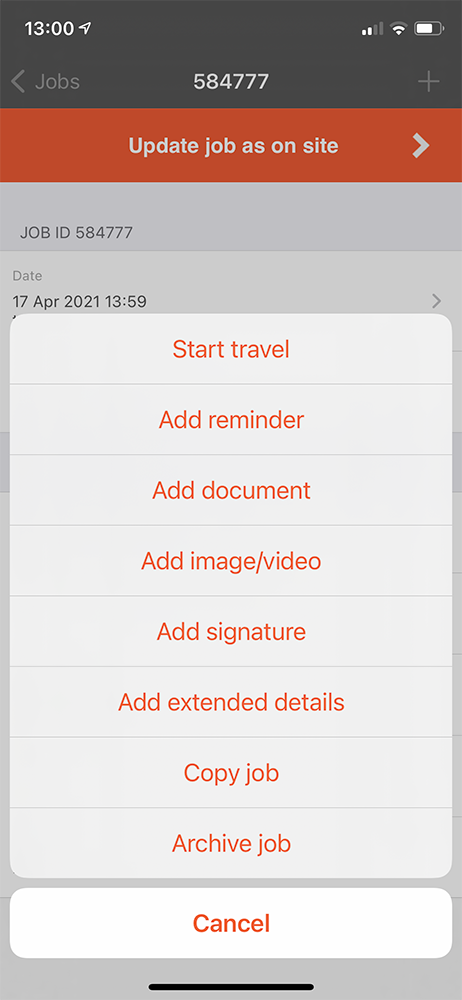
Adding documents on Android
Android is like iOS apart from a few subtle differences. To upload a job on Android
- Again, select the job
- Click the Okappy icon this time
- Select Add document or Add photo.
Copying jobs with documents
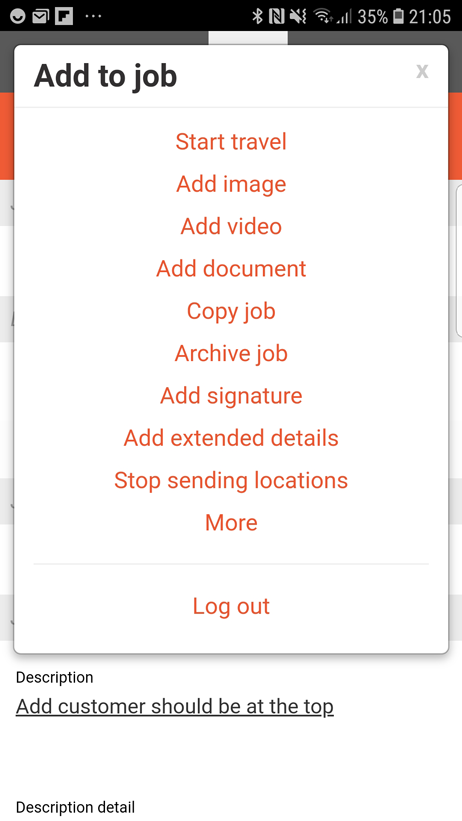
Once you have a document or attachment on a job. You can also copy the attachments when you’re copying the job. That makes it really easy to have a job which always has a specific document i..e, a RAMS doc
To do that, copy the job and ensure the Copy any attachments icon is selected.
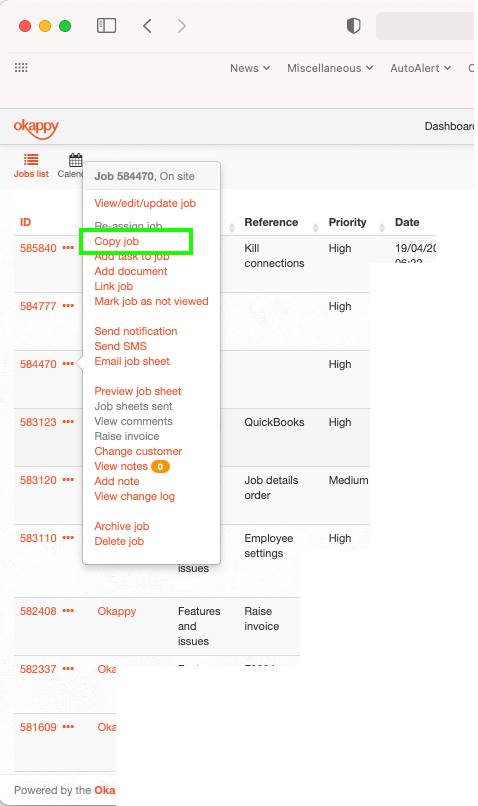
Copying jobs with documents on iOS
Likewise on the mobile app to copy a job and any attachments
- Click the Plus icon
- Select Copy job
- Update the details
- Turn the Copy any attachments switch to on

Copying jobs with documents on Android
Likewise on the mobile app to copy a job and any attachments
- Click the Okappy icon
- Select Copy job
- Update the details
- Turn the Copy any attachments switch to on

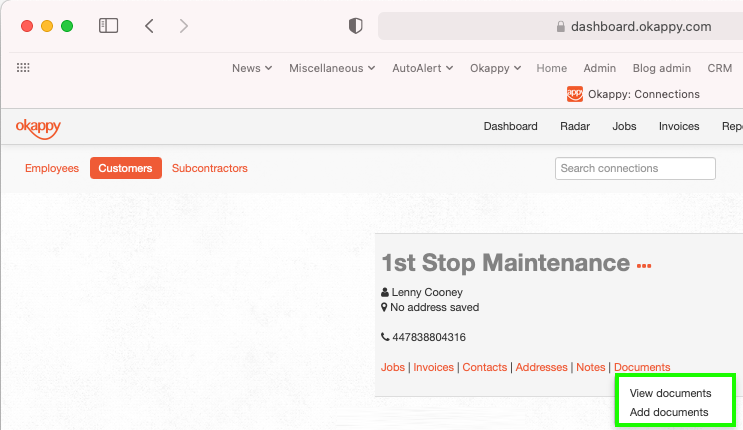
Adding documents to a customers record
You can also add documents to invoices and to your customers, subcontractors and employees.
To add a document to your customer.
- Go to the Connections screen
- Select Customer
- Find the relevant customer
- Click the Documents link
- Click Add documents.
You can also view any documents for that customer from the same link
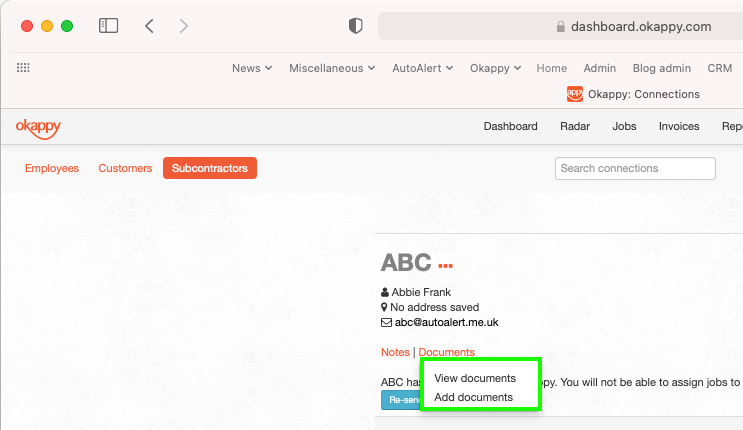
Adding documents to a subcontractors record
You can also add documents to invoices and to your customers, subcontractors and employees.
To add a document to your customer.
- Go to the Connections screen
- Select Subcontractor
- Find the relevant subcontractor
- Click the Documents link
- Click Add documents.
You can also view any documents for that subcontractor from the same link
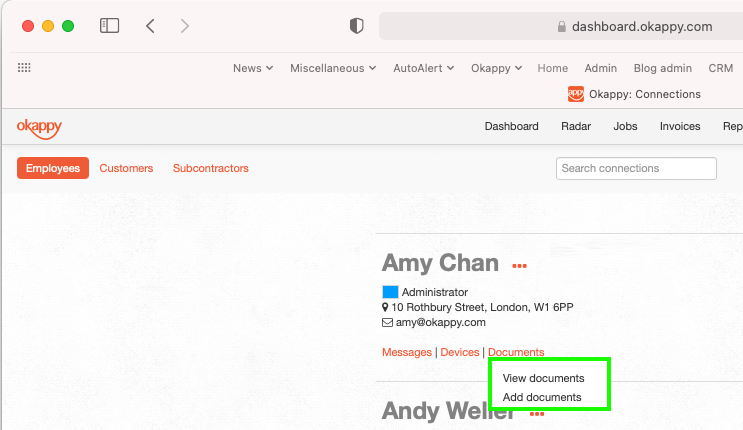
Adding documents to an employee record
You can also add documents to invoices and to your customers, subcontractors and employees.
To add a document to your customer.
- Go to the Connections screen
- Select Employees
- Find the relevant employee
- Click the Documents link
- Click Add documents.
You can also view any documents for that employee from the same link
Further help and support
- https://www.okappy.com/support-article/information-visibility
- https://www.okappy.com/support-article/employees-or-subcontractors-what-is-the-difference
View the webinar
Get the webinar slides
Leave your details above and we’ll send out a copy of the slides. We’re also interested to hear of any other topics you may like to hear about for future webinars.
The post Webinar – Top things you didn’t know about Okappy appeared first on Okappy.
]]>The post VAT Reverse Charge Webinar appeared first on Okappy.
]]>The VAT Reverse Charge legislation was introduced in March 2021. Over 20 minutes we discussed how the VAT reverse charge works, when you should use it and how to configure Okappy along with your other systems to provide VAT reverse charge invoices to your customers.
Introducing Okappy
Okappy is a business two business connected workforce management platform which applies social and market networking technology to a real business need using our unique Portal+ platform. The need to communicate and collaborate with your employees who are often at different locations (and now more than ever). With your subcontractors and with your customers.
Okappy helps the most forward looking and dynamic companies increase transparency, reduce duplication, costs and errors and increase efficiency. Ultimately making a significant contribution to bottom line profits.
With Okappy, you can connect to your employees, customers and subcontractors.
- Send and receive jobs
- See the status of those jobs as they’re updated by your engineers and subcontractors
- Then raise your invoices at the touch of a button
It’s that last stage which was the reason for the webinar.
What is the VAT Reverse Charge
From 1st March 2021, if you supply goods and services to the construction sector, then you will need to implement VAT reverse charging on your invoices
Before VAT Reverse charge, you would have paid VAT on products or services bought in the UK. You would declare the total amount of VAT you are going to pay to HMRC that quarter, and also the total amount of VAT you are going to reclaim.
Domestic VAT reverse charge legislation (DRC) is a change in the way Construction Industry Scheme (CIS) registered construction businesses handle and pay VAT. It was introduced at the start of this month, having previously been delayed from October 2019.
The reason why HMRC are introducing it is because they’ve identified construction as one of the leading sectors for VAT fraud where some sub-contractors claim VAT but never pay it.
By moving the VAT charge to the end user, HMRC intends to make this kind of fraud impossible. So now, sub-contractors will require the contractor employing them to handle and pay the VAT directly to HMRC.
Who does it affect?
The new legislation affects all VAT registered businesses who supply or receive construction and building services that are reported under the CIS.
Checklist
- Check when you must use the reverse charge
- Find out how the charge works if you supply products and services
- Find out how the charge works if you purchase products and services
- Understand how your systems work with the VAT reverse charge
- Consider the impact on your cashflows
- Provide training to staff
We talked about how the VAT reverse charge works with Okappy and with Xero. If you’re using other accounting software, you’ll need to check that your software is up to date, especially if you have older desktop based systems.
You also want to think how it could affect your cashflow especially if you are paying a lot of VAT on supplies but now not receiving VAT from your customers. It may be worth changing over to HRMC’s monthly repayment trader scheme. Either way, it is worth planning out your bills over the next couple of quarters when cash flow will be at its most difficult.
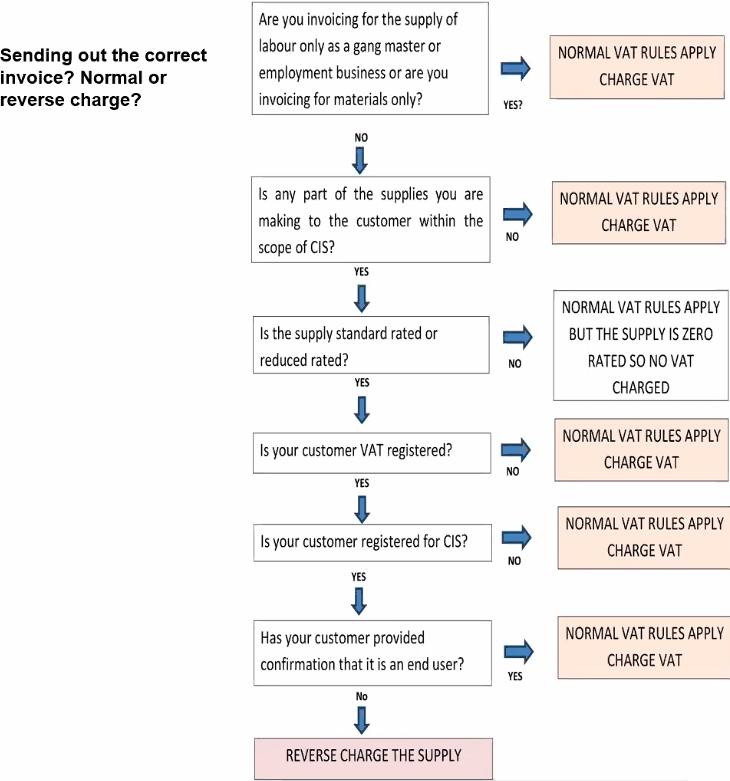
When must it be used?
It must be used if you’re a VAT registered company operating within the Construction Industry Scheme (CIS). But, it must only be used in specific circumstances. It applies to materials if they’re used as part of a service provided under CIS. Not if they are provided independently.
- Your customer must be VAT registered in the UK
- The payment for supply is reporting within CIS
- Services are being supplied at the standard or reduced rate
- You are not an employment business
- You’re customer is not an end user or intermediary supplier.
Invoice wording
Invoices should clearly indicate the reverse charge applies. They should show the percentgate of VAT which was charged (whether reduced rate or standard) and have a label advising that the “Customer to account to HMRC for the reverse charge output tax on the VAT exclusive price of items marked ‘reverse charge’ at the relevant VAT rate as shown.
There has been discussion around whether the amount of VAT which would otherwise have been calculated should be shown. The general consensus seems to be that it shouldn’t and certainly mostly other software provides are doing it this way.
I think the fear is that, and particularly with accounting software is that if there is a calculation then the VAT will end up someone in your accounts which it shouldn’t. My feeling also is that it’s the responsibility of the ultimate contractor to calculate the VAT and they shouldn’t be blindly copying your invoices.
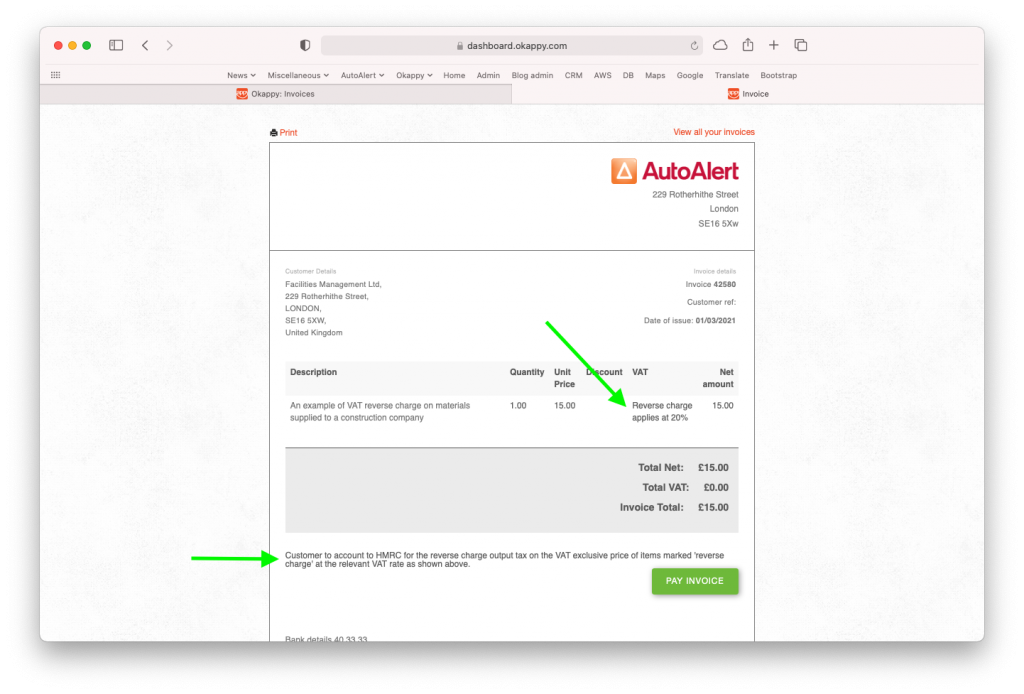
1) Set up your customer within Okappy
Two set up VAT reverse charging on Okappy depends on whether you are using Xero or other.
If you’re not using Xero, you first need to check the VAT reverse charge option in the Connections screen > Customers > Account settings
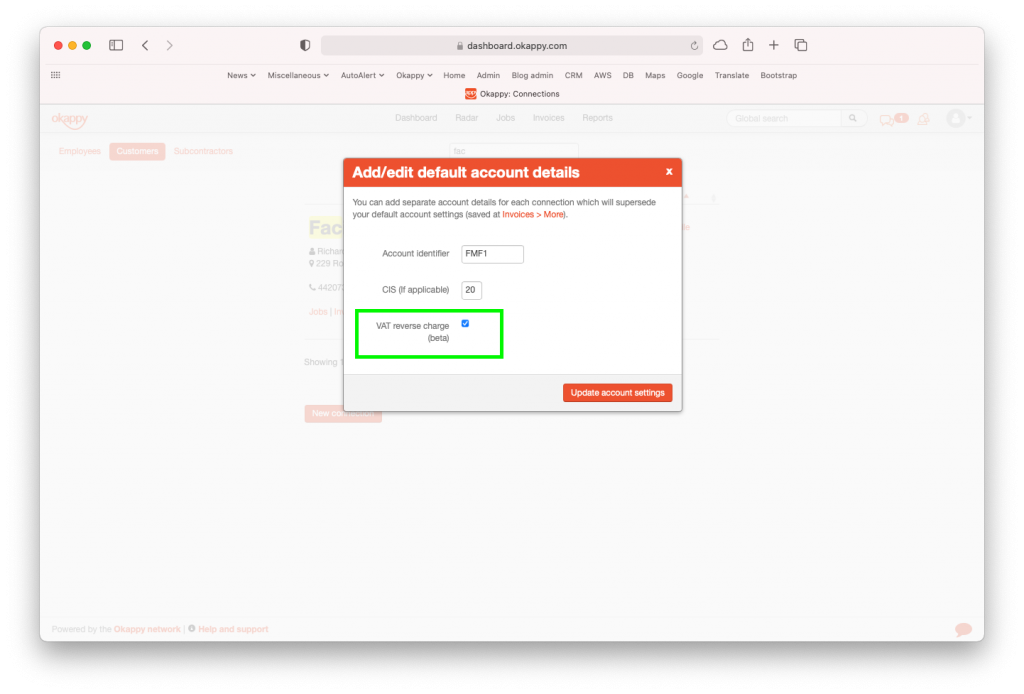
2) Set up your invoice line items
Then set up an item or items which will be used for VAT reverse charge.
This menu is available from the Invoice screen > Invoice options > Account settings
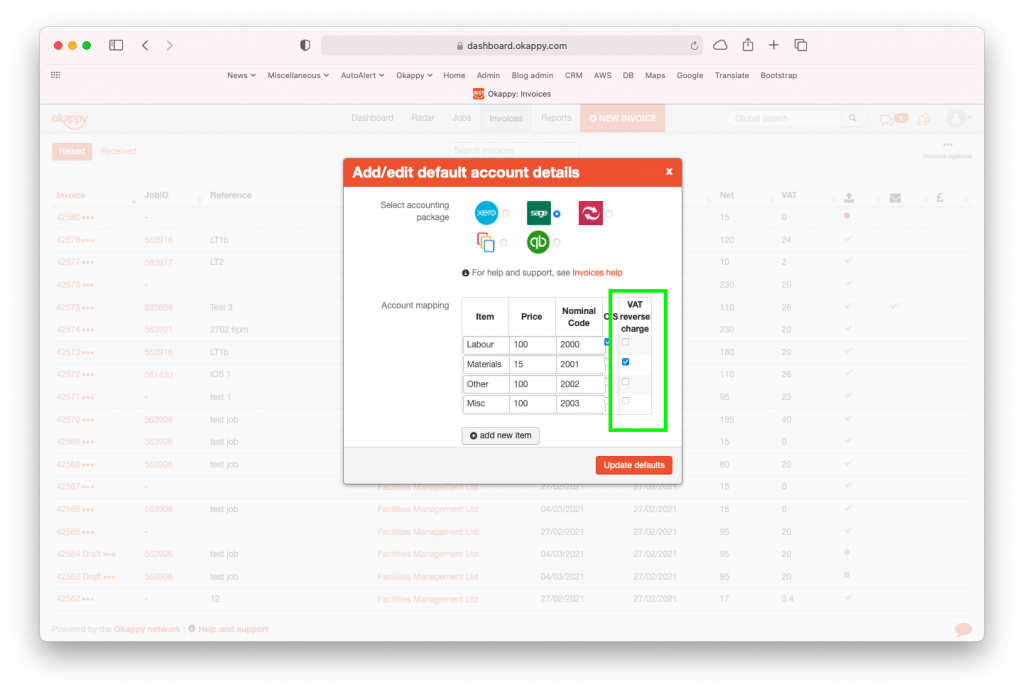
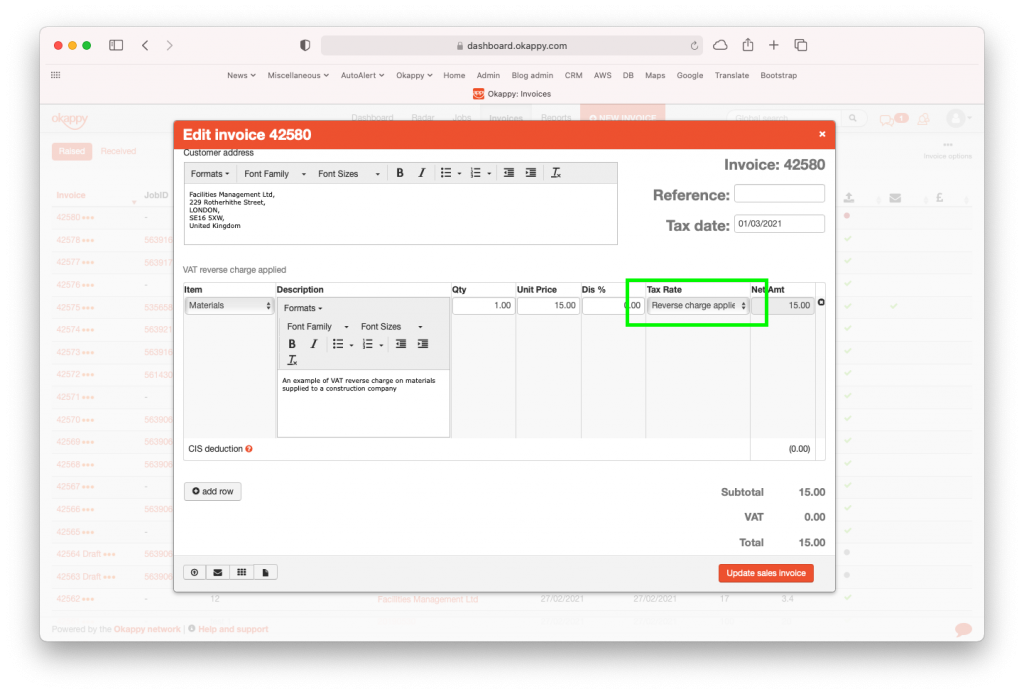
3) Raise your invoices
When you raise your invoices, if you select the VAT reverse chargeable item for a customer that has the VAT reverse charge flag set, then the VAT will be set to Zero and the line will show that VAT reverse charge has been used.
Adding the VAT reverse charge tax rate in Xero
With Xero, it’s a bit different as Okappy pulls in the items automatically from Xero.
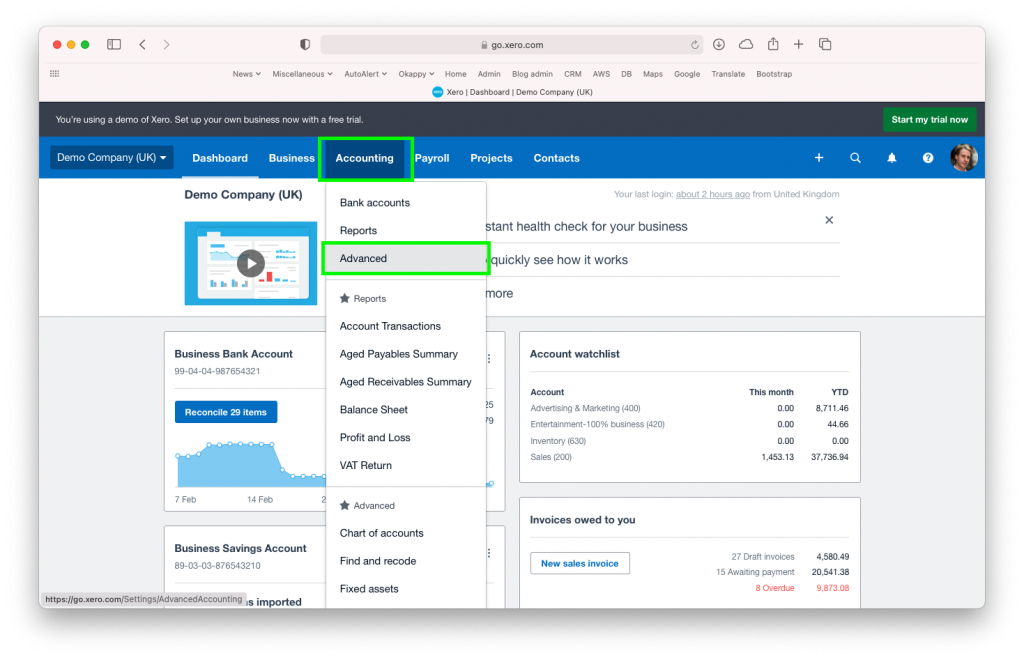
To set up VAT reverse charge in Xero, first go to the Accounting menu within Xero > Advanced > Tax rates
And then add the reverse charge tax rates
Add or update your products and services
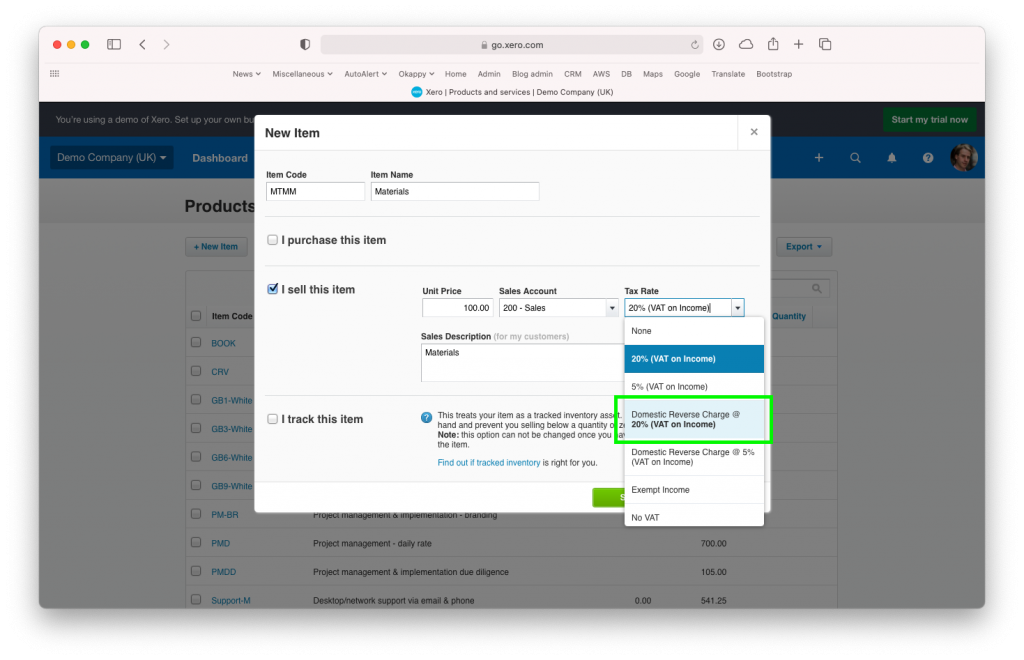
Then from the Business menu, select Products and Services and either add or edit the tax rate on a product or service to use the new VAT reverse charge tax rate.
Raise your invoices
Then it’s the same as before, select the relevant item when raising your invoice and the VAT will automatically be set to Zero and the relevant labels added.
Further information
View the webinar
Get the webinar slides
Leave your details above and we’ll send out a copy of the slides. We’re also interested to hear of any other topics you may like to hear about for future webinars.
The post VAT Reverse Charge Webinar appeared first on Okappy.
]]>