The post Updating your business hours appeared first on Okappy.
]]>Updating your business hours
You can set your hours of operation or business hours in Okappy. This sets the default times on the calendar and various reports.
Read on to find out how to set your business hours.
Setting business hours
To set your business hours from within the jobs or calendar page
- Click Job options towards the top right of the page
- Select Business hours

- Change your start and end of day times

- Click Set business hours
The business hours will be updated in your calendar and reports.


For more information on the different reports available – see our help and support > reporting.
For further information
For further information search in our support pages or forum
The post Updating your business hours appeared first on Okappy.
]]>The post Searching for information appeared first on Okappy.
]]>Searching for information
Finding key information quickly is one of the things that differentiates Okappy from other software. With other systems you may have to search through lots of different pages or even through different applications.
With Okappy, all your information is available with a minimum number of clicks.
Read on to find out how to get find information quickly and easily using the smart filters or global search.
Using the smart filters
Smart filters are available throughout Okappy. You can use them to quickly search in your jobs screen, through your invoices, connections or in a generated report.
Start typing part of a word to quickly filter down to the relevant jobs or invoice etc which contain that word. You could try with a postcode, name or telephone number or any part of the description.
Smart filters are available in the following screens
- jobs dashboard
- invoices
- connections
- reports

Using the global search
Global search is also available throughout the app. Simply enter a word in the global search bar and click the magnifying glass to start searching.
The window will show the relevant results depending on what screen you are currently in. If you are in the jobs dashboard, the first results shown will be for any relevant jobs.

From there, you can also search other areas such as related invoices

You can search your Customers, or search support articles

For further information
For further information search in our support pages or forum
The post Searching for information appeared first on Okappy.
]]>The post Creating a job using the Okappy API appeared first on Okappy.
]]>Creating a job using the Okappy API
Okappy is a B2B workforce management platform consisting of companies, employees and devices. Companies can connect to customers, subcontractors and employees. Add jobs and then assign those jobs to an employee or subcontractor.
To create a job using the Okappy API, follow the instructions below
Authentication
First you will need to get an up to date authentication token. For further information see authenticating with Okappy.
Creating a job
Add a job using the following endpoint.
POST /jobs
Headers
| Header | Content |
|---|---|
| Authorize | Bearer token |
The token should be a string taken from the “access_token” field of a response to an authorise request.
Parameters
No parameters
Body data
The following table lists the fields that may be present in the body data:
| Name | Content | Required |
|---|---|---|
| CreatedBy | The username of who entered the job | No |
| Name | A contact name for the job | No |
| Address1 | A primary address for the job in the format 10 Downing Street, London, WC1 | No |
| Address2 | A secondary address for the job in the format 10 Downing Street, London, WC1 | No |
| Address3 | An additional address for the job in the format 10 Downing Street, London, WC1 | No |
| Telephone | A telephone number for the job | No |
| Mobile | A mobile phone number for the job | No |
| Phone2 | An additional phone number for the job | No |
| Priority | The job’s priority | No |
| Description | The description of the job | No |
| MediumField1 | A medium field corresponding to medium field 1 in your job template | No |
| MediumField2 | A medium field corresponding to medium field 2 in your job template | No |
| MediumField3 | A medium field corresponding to medium field 3 in your job template | No |
| MediumField4 | A medium field corresponding to medium field 4 in your job template | No |
| MediumField5 | A medium field corresponding to medium field 5 in your job template | No |
| MediumField6 | A medium field corresponding to medium field 6 in your job template | No |
| MediumField7 | A medium field corresponding to medium field 7 in your job template | No |
| MediumField8 | A medium field corresponding to medium field 8 in your job template | No |
| LargeField1 | A large field corresponding to large field 1 in your job template | No |
| LargeField2 | A large field corresponding to large field 3 in your job template | No |
| SmallField1 | A small field corresponding to small field 1 in your job template | No |
| SmallField2 | A small field corresponding to small field 2 in your job template | No |
| SmallField3 | A small field corresponding to small field 3 in your job template | No |
| SmallField4 | A small field corresponding to small field 4 in your job template | No |
| SmallField5 | A small field corresponding to small field 5 in your job template | No |
| StartDateTime | Start time of the job, in the format yyyy-mm-dd h:mm | No |
| EndDateTime | Start time of the job, in the format yyyy-mm-dd h:mm | No |
Note: The first name, last name and company name are not required fields. However, if they are left blank, it could make it hard so see which connection is which.
Reference: For further information about setting up job templates, see https://www.okappy.com/support-article/creating-job-templates/
Response
| Code | Description |
|---|---|
| 200 | Operation successful |
| 400 | Bad request |
| 401 | Unauthorised |
| 415 | Data sent in wrong format (should be JSON) |
The post Creating a job using the Okappy API appeared first on Okappy.
]]>The post Getting the details for a job using the Okappy API appeared first on Okappy.
]]>Getting details of your job using the Okappy API
Okappy is a B2B workforce management platform where you can connect to your customers, employees and subcontractors.
To get the details for one of your jobs using the Okappy API, follow the instructions below
Authentication
First you will need to get an up to date authentication token. For further information see authenticating with Okappy.
Getting details of your job using the job id
Get details of your job using the following endpoint.
GET /jobs/{jobId}
Headers
| Header | Content |
|---|---|
| Authorize | Bearer token |
The token should be a string taken from the “access_token” field of a response to an authorise request.
Parameters
No parameters
Responses
| Code | Description |
|---|---|
| 200 | Operation successful |
| 400 | Bad request |
| 401 | Unauthorised |
| 415 | Data sent in wrong format (should be JSON) |
The post Getting the details for a job using the Okappy API appeared first on Okappy.
]]>The post Getting your list of jobs using the Okappy API appeared first on Okappy.
]]>Getting your jobs list using the Okappy API
Okappy is a B2B workforce management platform where you can connect to your customers, employees and subcontractors. Send and receive jobs and assign them to your employees AND subcontractors.
To get your list of jobs using the Okappy API, follow the instructions below
Authentication
First you will need to get an up to date authentication token. For further information see authenticating with Okappy.
Getting your list of jobs
Get your list of jobs using the following endpoint.
GET /jobs
Headers
| Header | Content |
|---|---|
| Authorize | Bearer token |
The token should be a string taken from the “access_token” field of a response to an authorise request.
Parameters
| Parameter | Description |
|---|---|
| limit | The number of jobs to return |
| offset | The row number to start from |
For example sending a limit of 10 with an offset of 5 will return 10 jobs starting from the 5th job.
Responses
| Code | Description |
|---|---|
| 200 | Operation successful |
| 400 | Bad request |
| 401 | Unauthorised |
| 415 | Data sent in wrong format (should be JSON) |
The post Getting your list of jobs using the Okappy API appeared first on Okappy.
]]>The post Recording travel time appeared first on Okappy.
]]>Recording travel times on jobs
If you want to charge travel time for your jobs, you can do this easily with Okappy. Read on to find out how to record the travel time to and from a job
Starting travel
To record when you have started travelling to your job. Open Okappy’s mobile app and
- go to one of your jobs.
- Click into the job
- Click the Plus icon (iOS) or the Okappy icon (Android)
- Click Start travel

This will record the travel time and location.
You can click Start travel at any time whilst the job is open.
If you click Start travel before clicking On site, then you can see the travel time to the job. To record travel from the job. Click start travel again before clicking Complete.
Viewing travel times
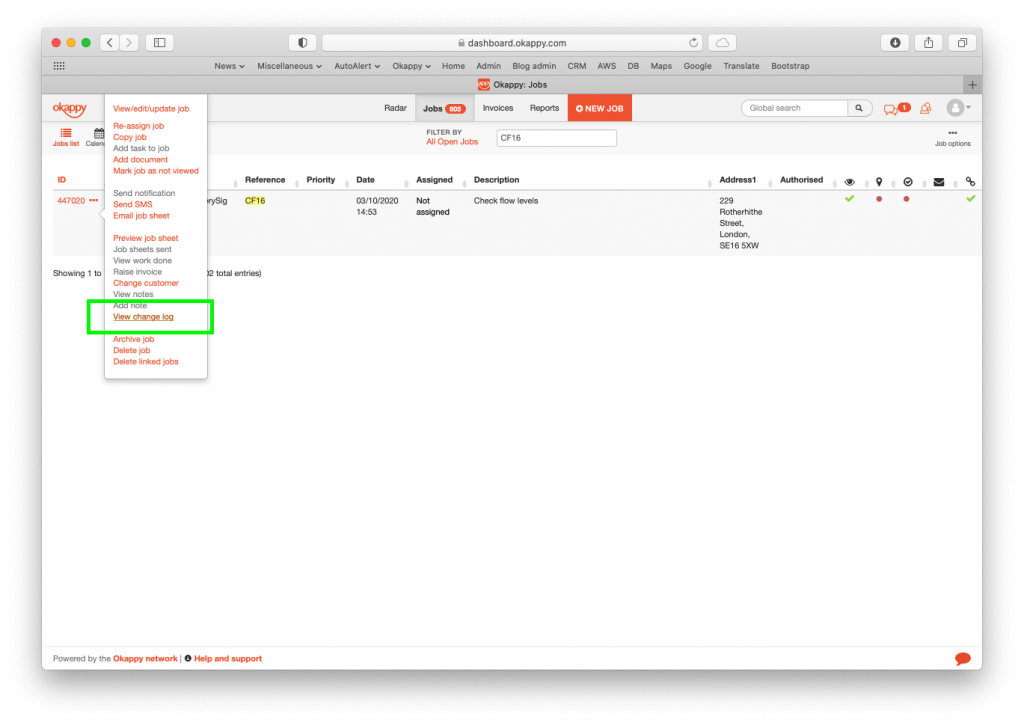
To view when the travel time was started for each job,
- open the Okappy web app
- Select your job
- Click the Three dots next to the job id
- Click View change log

The travel time will be shown in the change log for that job along with the device’s location.

From there, you can work out the travel time and confirm where travel was started from (or finished to)
For further information
For further information search in our support pages or forum
The post Recording travel time appeared first on Okappy.
]]>The post Troubleshooting – I cannot see my jobs appeared first on Okappy.
]]>I cannot see my jobs
Okappy’s unique market-network allows you to connect to your customers and subcontractors. Your customer can add jobs and assign them to your company. The beauty of a network is that you and your customers can see the status of your jobs as they’re updated in real-time.
Check out how to Connect to customers and subcontractors
But what happens if you cannot see your jobs. Read on for troubleshooting advice.
Troubleshooting steps
1) Check what email you are using
If you can log in but can’t see your jobs. First check that you are logged in to the correct account.
To confirm what email you are using to log,
- click the Okappy icon from within the app
- Scroll down and click More
- Go to Login details
Your log in email is shown at the top of the screen

If you are using a different email. Reset the app from the Okappy icon (scroll down for reset instructions) then login with the correct email for that account.
Note: Where one email forwards to another i.e., googlemail and gmail. This is still two separate email domains and the same one will need to be used when creating an account or logging in.
2) Refresh the jobs list
From within the app, check that you have the latest jobs by pulling down to refresh the list (iOS only) or by clicking the Jobs tab (Android). You can also force refresh the jobs list by
- clicking the Okappy icon from within the jobs screen, and
- clicking Check for new jobs
3) Check filters
Admin users can view all jobs or just those jobs that have been assigned using the My jobs filter.
Note: If you have been invited as a subcontractor by your customer, then you will be set up as an administrator by default. However, if you have the My jobs filter on, then any new jobs assign to your company won’t be visible unless you or someone else within your company has assigned the job to you.
You can see whether you have the My jobs filter on from the top of the screen.

To show all jobs,
- Click the Okappy icon
- Click Show all jobs

4) Check the data network
If your device does not have a good data connection, then it will not be able to download the latest jobs (although any jobs previously downloaded will still be shown)
To check whether your device has a good data connection from within the app
- Click the Okappy icon
- Click More
- Click Test network speed
If the network is poor, try turning airplane mode on and then off to reset the connection or move to an area with better coverage.
5) Reset the Okappy app
If all else fails, you can reset the app. This will clear the memory, refresh the jobs queue and make the app pull down all the latest information.
To reset the app on iOS and Android
- Click the Okappy icon,
- Scroll down and click More
- Scroll down and click Reset app
- A warning will be displayed. Check the warning and then
- Click Reset
- Log in again
For further information
For further information search in our support pages or forum
The post Troubleshooting – I cannot see my jobs appeared first on Okappy.
]]>The post Syncing jobs with your calendar appeared first on Okappy.
]]>Syncing jobs with your calendar
Okappy has built in calendar functionality so you can easily see your jobs, move them around and assign them to different engineers.

But what if you also use your own calendar. With Okappy you can also sync to your existing calendar software. Read on to find out how.
Obtain your calendar URL
To sync your calendar with Okappy, you will first need to get your calendar url. To get the URL
From within the webapp,
- Go to your job dashboard
- Click Job options

- Click Publish to calendar

- Copy the calendar url
- Subscribe to the url using your calendar software
Note: Only jobs assigned to you will be shown.
Subscribing to your calendar using Calendar on your Mac
To subscribe to the Okappy calendar with the calendar application on your Mac
- Click File
- Click New Calendar Subscription

- Enter the URL you copied from Okappy (as detailed above)

- Click Subscribe
Your jobs will be shown on your calendar.
Subscribing to your calendar using Google Calendar
To subscribe to the Okappy calendar using Google Calendar
- Open Google calendar on the web at https://calendar.google.com
- Click Other Calendar +

- Click Subscribe to calendar

- Click From URL
- Paste the URL you copied from Okappy (as detailed above)

- Click Add calendar
Note: Google Calendar does not provided any control as to how often Google Calendar will refresh. It could take up to 24 hours for your events to show.
Subscribing to your calendar using other software
To subscribe to the Okappy calendar using another calendar application, please refer to their help and support.
For further information
For further information search in our support pages or forum
The post Syncing jobs with your calendar appeared first on Okappy.
]]>The post Creating public jobs appeared first on Okappy.
]]>Creating public jobs
Okappy’s unique connected workforce management platform means you can connect to your subcontractors and employees, assign jobs to them and see the job’s status as it’s updated by your engineers out in the field.
But what happens if you’re not sure who to assign the job to, or if you want your employees or subcontractors to be able to pick and accept the jobs themselves. This is now possible with Okappy. Read on to find out how.
Creating your job
Simply create your job from within your web dashboard by clicking the New job button at the top of the screen.
Fill out the details.
Then select Public when assigning the job.

Clicking Add job will create your public job which is visible to all your employees and subcontractors
Accepting a public job as an employee
All public jobs that have been added by your company will be shown in your jobs list.

- Click into the job as you would any other job.
- Click Accept job
- The job will be assigned to you.
You can then carry on updating the job in the usual way.
Back in the office, they can see that you have accepted the job.

Accepting a public job as a subcontractor
To view public jobs that your customer has created,
- login into the mobile app.
- From within the jobs screen, click the Okappy icon
- Click View public jobs

Click into the job to see the details.
If you want to accept the job, click the Accept job button at the top of the screen

You can then continue to update the job as you would any of your other jobs.
Note: Accepting the job will assign the job to your company. If you have different employees, you may also want to assign it to your employee. This can be done from within the web dashboard or from within the app.
For further information see Re-assigning jobs.
For further information
For further information search in our support pages or forum
The post Creating public jobs appeared first on Okappy.
]]>The post Reassign jobs appeared first on Okappy.
]]>Reassigning jobs
Some customers assign jobs to their engineers or subcontractors as soon as the job comes in. Others leave them as not assigned initially and then batch assign jobs at the start of the day or week.
Whichever way you do it is up to you, but what if you want to re-assign a job which is currently not assigned or assigned to the wrong engineer. Read on to find out how to re-assign your jobs.
Re-assign a job from the web dashboard
To reassign a job from the web dashboard, simply click the pencil icon next to the name of assignee on the relevant job.

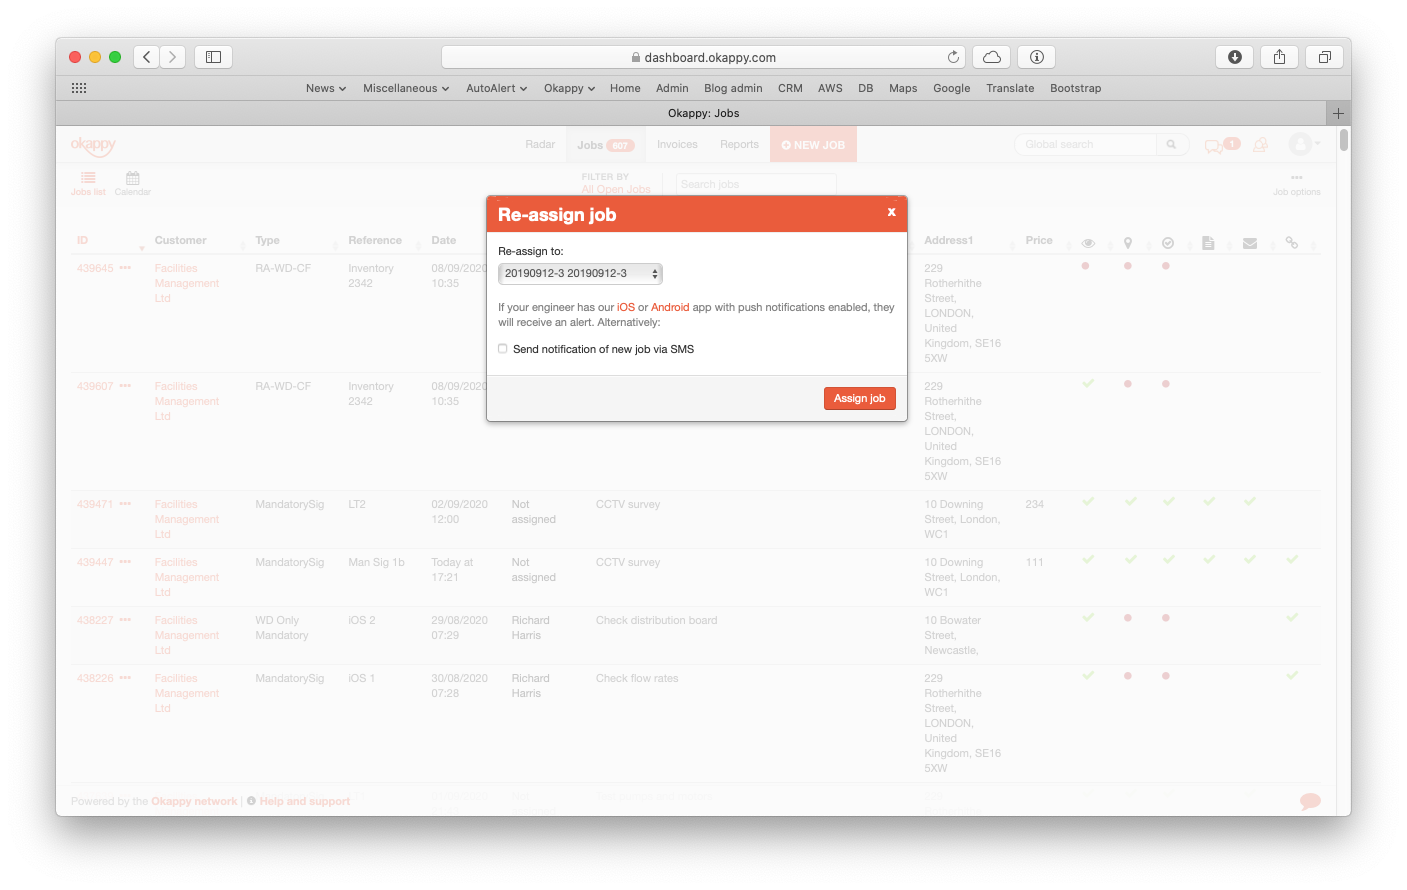
The re-assign window will be shown.

Select who you want to assign your job to (employees are at the top of the list, subcontractors at the bottom).
A push notification will be sent to the original employee or subcontractor (if relevant) and to the new engineer advising that the job has been re-assigned.
You can also send a text message to the new engineer by click the Send notification of new job via SMS checkbox.
Click the Assign job button.
Your job will be assigned and notifications sent.
Re-assigning a job from your mobile device
If you are an administrator, you can view all jobs and re-assign them.
To re-assign a job,
- click into the job
- Scroll down
- Click the assigned cell

Note: The cell will either say Not assigned, or Assigned to [name of employee or subcontractor]
Select the employee or subcontractor that would like to assign the job to
The job will be re-assigned.
For further information
For further information search in our support pages or forum
The post Reassign jobs appeared first on Okappy.
]]>