Getting started with Okappy
Okappy has been designed to be intuitive and easy to use. Whether you’re up a ladder, down a drain or in the office fielding calls from customers, you don’t want to be searching through lots of different screens to add a job or find information.
The platform is also unique in that it uses the latest networking technology to reduce cost, duplication and errors and streamline communication between you, your customers and your subcontractors.
Read on for a quick overview of getting started with Okappy.
Getting started
To start adding jobs, click the New job button from your ‘Jobs’ dashboard.

You can select the type of job using one of our standard templates. This will determine which job fields are shown.
You can also add your own templates by choosing the Add job sheet template option.
Select your customer and start adding your job details.
Once the job has the right details, you can assign it to one of your employees or subcontractors. If you haven’t already added your employee or subcontractor see below for more information. Alternatively, you can leave the job as unassigned for now. Then click the Add Job button.

The job will be created and will be shown on your jobs dashboard. As the job hasn’t been viewed or done yet, you’ll see red dots for each stage towards the right of the screen.
To view or edit the job, click the three dots icon ( ![]() ) next to the Job ID.
) next to the Job ID.
As the job is viewed, updated and completed, you’ll see the red dots change to green ticks ( ![]() )
)
To add an employee, click the Connection icon ( ![]() ) towards the top right of the screen and select New employee.
) towards the top right of the screen and select New employee.

Enter your employee’s details and select whether they are an administrator or a standard user.
An administrator can view and edit jobs as well as change settings, whereas a standard user can only view the jobs allocated to him/her. For more details, see Okappy User Types.
Each employee is identified by their email address and this is where their login details will be sent. You can either create a password yourself or leave it blank and allow the system to create one for them.
Once you’ve added an employee, you can start allocating jobs to them. If they’ve downloaded the iOS or Android app, they’ll get a push notification every time a new job is assigned to them (providing they have allowed push notifications in their phone’s settings).
To raise an invoice from a job, click on the Three dots icon ( ![]() ) new to the job and select Raise invoice.
) new to the job and select Raise invoice.

Note: Invoices can only be raised for jobs done for a customer.
Details of the work done will be automatically added. You can edit these details and add more lines to the invoice. Once you are happy with the invoice, click the Raise invoice button.
If you’re customer is connected, they will see the invoice in their invoices received dashboard. You can also email the invoice to them.
To view the invoices you have raised invoices (as well as see invoices you’ve received), click Invoices from the tab bar.
Note: The invoice option can be shown or hidden from your settings.
Okappy is a network. It operates in a similar way to platforms such as LinkedIn or Angelist. To add a customer or subcontractor, click the Connections icon ( ![]() ) towards the top right of the screen and then select either New customer or New subcontractor.
) towards the top right of the screen and then select either New customer or New subcontractor.

Enter an email address and click Next.
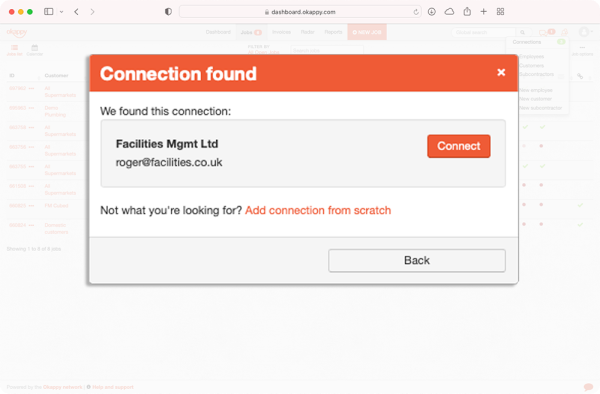
If your connection is already set up on Okappy, click Connect. If your connection’s email has not been recognised, choose the option to Create the connection from scratch.
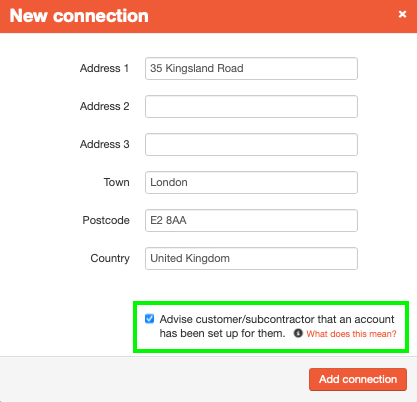
When adding a connection from scratch, you can select whether to send them an email inviting them to join you on Okappy.
Note: Subcontractors need to accept your invite before you can start assigning work to them. This is not required for a customer. You can still add their jobs whether they are connected or not.

For further information
For further information search in our support pages or forum